Thursday 22 October 2020

Teams Phone Screen Capture Tool

If you’re ever putting together documentation, training material or blog posts on Teams Phones, you don’t want to be in a situation where you are taking photos of the screen of the phone with a camera. Instead it’s always better to get a crisp and clear pixel perfect screen shot. Fortunately, Teams phone devices allow you to do this, however, it’s not very well documented. In this blog post I’m going to take you through the process of taking screen captures on Microsoft Teams phones and also introduce you to a tool that I created for taking screen shots and animated GIFs of your Teams Phone devices.


Teams Phone Screen Capture Tool


The Teams Phone Screen Capture Tool was created to both make screen captures easier to take and also to create fully marked up animated GIFs of your Teams Phone Screen for documentation, blog posts, training material, etc.


Tool Features:
  • Capture jpeg images of static screen images.
  • Capture animated GIF screen captures
  • Edit the length of captured GIFs
  • Resize captured GIFs
  • Markup captured GIFs with rectangles or circle shapes in multiple colours
  • Currently supports Poly and Yealink devices. AudioCodes is not supported yet due to their current implementation methodology.

Version 1.01:

  • Updated to support for non-Teams CCX and VVX phones
  • Support for PowerShell Version 7

Version 1.00: Initial Release


Download from Github


How to Enable the Screen Capture Feature on Teams Phones


The screen capture feature is enabled on each of the Teams phone brands in a slightly different way. I have created a walk through for how it’s done on each device brand.


Screen Capture with Poly Teams Phones


Step 1: Navigate to Settings > Device Settings > Debug > Screen Capture


Step 2: Navigate to Settings > Device Settings > Admin Only > (Enter Password) > Network Configuration > Web User Interface


Note: The default password is "456".


Step 3: Open the Teams Phone Screen Capture Tool in PowerShell:


IPAddress: Enter the IP Address of the Poly Phone.

Phone Type: Poly

Password: <“456” is the Poly default>

Click the “Show Screen Button”

The tool will then try to connect with the details given. Once connected you should see the screen in real time:


Now you can Save a Screenshot or record an animated GIF.


Screen Capture with Yealink Teams Phones


Step 1: Navigate to  Settings > Device Settings > Admin > (Enter Password) > Debug > Screen Capture > Enable


Note: The default password is "admin".


Step 2: Open the Teams Phone Screen Capture Tool in PowerShell:


IPAddress: Enter the IP Address of the Yealink Phone

Phone Type: Yealink

Password: <“admin” is the Yealink default>

Click the “Show Screen Button”

The tool will then try to connect with the details given. Once connected you should see the screen in real time:


Now you can Save a Screenshot or record an animated GIF.


Screen Capture with AudioCodes Teams Phones


The AudioCodes Teams phones don’t offer the same web-based access to their screen captures taken on a device. For this reason the tool does not support them at the moment. If you do want to take a screen capture on an AudioCodes phone you can but it’s a bit more work. You’ll need an SSH client (Putty will do) and a TFTP client in order to pull down a copy of the screen shot off the phone.


Here are the steps required:

Step 1: Turn on the Screen Capture setting in the phone:  Settings > Device Settings > Device Administratoion > (Enter Password) > Debugging > Screen Capture


Step 2: Access the phone via SSH

Note: The default username/password is "admin"/"admin".


Step 3: Run a TFTP client on your PC


Step 4: Run the commands from the SSH command line:

screencap /sdcard/screen_cap.png

curl -T /sdcard/screen_cap.png tftp://host_ip


These commands will make the phone take a screen capture which is saved onto the phone. Then the second command sends the screen capture to your TFTP server which you need to have running and accepting inbound file transfers.

This is not the most elegant of solutions and I hope that AudioCodes adds a web-based method for accessing the screen shots in the future.


GIF Editing Studio


After you have finished capturing the GIF a new window will be displayed that allows you to edit the GIF. The screen looks like this:


If you would like to mark up the GIF with coloured circles or rectangles to highlight something on the screen, you do this by first selecting the frame you want the shape to appear on, then select the "Markup Shape" and "Markup Colour" values, and then you simply click and drag on the image to place the shape where you want it. This will make the shape appear on the particular frame you had selected. If you would like to extend the amount of time it is on the screen for, you select the shape in the "Markup Shapes" list and edit the StartFrame and/or EndFrame column value(s). 

You can also edit the dimensions, location, colour and shape after selecting the shape in the list. Once you have made the changes you want to the selected shape you click the "Update Shape" button and it will save the changes. If you no longer want a shape that you had previously added you select the shape from the list and click the "Delete Shape" button to remove it. Note: when you select a shape in the "Markup Shapes" list the first frame that it appears on will be shown in the image box and the shape will be highlighted in light blue so you know which shape you've selected (if you un-select the shape in the list it's real colour will be displayed).

You can change the length of the animated GIF by changing the "Start Frame" and "End Frame" values underneath the image on the left hand side of the interface. The start and end frames selected will be reflected in the final GIF that is exported from the tool. The "Image Size" value allow you to change the height of the image when you change the height the width will be automatically changed to match. If you are making a long animated GIF then it can be useful to reduce the size of the output in order to keep the file size down on the exported GIF. By default the GIF will loop for an infinite amount of time if you would like it to only loop once you un-check the "Infinite Loop" checkbox.


Teams Admin Portal - Device Setting


You can control the Screen Capture setting that each of the phone brands devices need turned on in order to get access the screen capture images. The setting is found in the Devices > IP Phones > Configuration Profiles (tab) > + Add > Screen Capture:


This allows you to push this setting out to phones if that is how you want to do it. Keep in mind though that the Web User Interface setting required for Poly phones to support screen capturing is not available from the Admin Portal.


The Wrap Up


There you go, a new tool for your screen capturing pleasure. Enjoy!


Read more →

Thursday 10 September 2020

Using DLP Policy to Block Passwords in Microsoft Teams Chats and Channels

You may have heard that the massive Twitter hack recently came from an admin credentials found in a Slack channelThis raises the question: how can you avoid people putting passwords into Microsoft Teams channels and chats to avoid this kind of situation happening to your business? In the case of Microsoft we are talking about Office 365 passwords being passed around in chats by help desk personnel or staff that didn't realise the potential implications of leaving this data lying around. I had a look through the Microsoft Sensitive Information Types and noticed that there was not a built-in policy for AD and AAD password formats. You may be excused from thinking that the built in DLP policies are the only ones that are available to you. However, you have the ability to create your own DLP policies and, with some fine tuning, make them block things like passwords from being posted in Teams. In this blog post I’m going to give an example of how you could use a custom AD/AAD password Sensitive Information Type to create a DLP policy in Teams for stopping people from sending around Office 365 passwords in Teams chat and channel messages. You could also use the Sensitive Information Type created here with Communications Compliance policies, etc, but we are going to focus on DLP policies for this example. 

Data Loss Prevention Licencing


First things first, let's talk about the licensing that you need to do DLP within Teams. I find the licensing for these security features to be a bit of a minefield, and this is a good example. If you’re talking about DLP for Exchange and SharePoint then you can do that with a Office/Microsoft E3 licence, so of course you would expect the same for Teams. Unfortunately that’s not the case. You need Office/Microsoft E5 licensing (or a handful of different add-on licences) in Teams to take advantage of DLP policies. Here’s a spiel from Microsoft docs that explains it for you:

“Data loss prevention capabilities were recently added to Microsoft Teams chat and channel messages for users licensed for Office 365 Advanced Compliance, which is available as a standalone option and is included in Office 365 E5 and Microsoft 365 E5 Compliance. Office 365 and Microsoft 365 E3 include DLP protection for SharePoint Online, OneDrive, and Exchange Online. This also includes files that are shared through Teams because Teams uses SharePoint Online and OneDrive to share files. Support for DLP protection in Teams Chat requires E5.”

You can read more here: docs

Sensitive Information Types


The concept of a Sensitive Information Type usually relates to matching data that might be considered private or sensitive. This is especially the case when dealing with organisations that might store customer data and have compliance around keeping this data safe and not sending it off site, etc. Microsoft has built many data matching policies for things like passport numbers, US Social Security numbers, Australian Tax File numbers, etc. If you would like to see a list of these pre-built rules and how they match data, there is some good documentation here: docs

Something that’s not on this list is AD or AAD passwords, which in some ways I find to be a bit weird considering this is what’s used for Office 365 sign-ins. 

A Sensitive Information Type is made up of the following things (as described by Microsoft Docs):

  • Primary pattern: employee ID numbers, project numbers, etc. This is typically identified by a regular expression (RegEx), but it can also be a list of keywords.
  • Additional evidence: Suppose you're looking for a nine-digit employee ID number. Not all nine-digit numbers are employee ID numbers, so you can look for additional text: keywords like "employee", "badge", "ID", or other text patterns based on additional regular expressions. This supporting evidence (also known as supporting or corroborative evidence) increases the likelihood that nine-digit number found in content is really an employee ID number.
  • Character proximity: It makes sense that the closer the primary pattern and the supporting evidence are to each other, the more likely the detected content is going to be what you're looking for. You can specify the character distance between the primary pattern and the supporting evidence (also known as the proximity window) as shown in the following diagram:

  • Confidence level: The more supporting evidence you have, the higher the likelihood that a match contains the sensitive information you're looking for. You can assign higher levels of confidence for matches that are detected by using more evidence.

So when you build your own Sensitive Information Type, the main things that you need to worry about are being able to capture the sensitive information using a regular expression, and making a list of words that are likely to be used in close proximity to the text captured by the regular expression. This is what we are going to focus on next.

Primary Regex Pattern


As previously mentioned the primary matching rule is a regular expression. Something that’s not really documented as clearly in the Microsoft docs is that they police the regular expression rules for Sensitive Information Types so you can’t go and put in some super CPU-intensive rule that will affect the performance of the platform. If you put in a Regex expression that doesn’t adhere to these rules, then you will get an “Invalid Regex” error that shows up when you enter your regex. I hit this in the first Password check rules that I created and I had to do some massaging of the regex to get it into a format that passed these rules. Here’s a list of the rules for your reference:

When entering the regex value for a new Sensitive Information Type, the following rules are used to check the regular expression:

1. Cannot begin or end with alternator "|", which matches everything because it's considered an empty match.
For example, "|a" or "b|" will not pass validation.

2. Cannot begin or end with a ".{0,m}" pattern, which has no functional purpose and only impairs performance.
For example, ".{0,50}ASDF" or "ASDF.{0,50}" will not pass validation.

3. Cannot have ".{0,m}" or ".{1,m}" in groups, and cannot have ".*" or ".+" in groups.
For example, "(.{0,50000})" will not pass validation.

4. Cannot have any character with "{0,m}" or "{1,m}" repeaters in groups.
For example, "(a*)" will not pass validation.

5. Cannot begin or end with ".{1,m}"; instead, use just "."
For example, ".{1,m}asdf" will not pass validation; instead, use just ".asdf".

6. Cannot have an unbounded repeater (such as "*" or "+") on a group.
For example, "(xx)*" and "(xx)+" will not pass validation.

More information available here: docs.

Now let's consider the rules that govern what an Active Directory and Azure Active Directory complex password will look like. These are the rules that describe a complex password for both platforms:

Passwords must be a minimum of 8 characters and a maximum of 256 characters.
Passwords require at least include characters that match three out of four of these:
  • Lowercase characters
  • Uppercase characters
  • Numbers (0-9)
  • Symbols
In order for us to capture passwords using a Sensitive Information Type policy, we need to be able to describe the item as a regular expression. To do this you will need to have some RegEx skills and understanding. Teaching RegEx is a bit outside of the scope of this article so rather than doing that I'm going to give one that I prepared earlier. The following Regex fulfills Microsoft’s regex limitations and will match AD/AAD complex password formats as described above. Here is is:

((?=[\S]*?[A-Z])(?=[\S]*?[a-z])(?=[\S]*?\d)|(?=[\S]*?[A-Z])(?=[\S]*?[a-z])(?=[\S]*?[^a-zA-Z0-9])|(?=[\S]*?[A-Z])(?=[\S]*?\d)(?=[\S]*?[^a-zA-Z0-9])|(?=[\S]*?[a-z])(?=[\S]*?\d)(?=[\S]*?[^a-zA-Z0-9]))[^\s]{8,256}

Yep, that's quite a hefty regular expression. Feel free to break it down and try to figure out how it works. Or just test it out and see if it works the way you want it to :)


Additional evidence


In addition to just having a Regex rule, we also need to have some additional evidence in the Sensitive Information Type configuration. The additional evidence usually comes in the form of words that might be found near the RegEx matched password. In this case is fairly likely that the word “password” will be included in the same message in which the actual password will be sent. The words that you include in the list will be match any case type (upper or lower or combination) so you only need to put the words in once. For this example, I am going to keep this simple and match some common password variations:

"password","pass","pwd"


Create the Sensitive Information Policy


Log into the https://compliance.microsoft.com/ and open the Data Classification > Sensitive Info Types (tab) and click the "+ Create Info Type" button.

Step 1: Give it a name.


Step 2: Add and element.


Step 3: Enter the regular expression that I detailed earlier. Add the supporting element key word list I mentioned earlier. The minimum count in this case is 1 because we only need to see one of these key words to make a match.

Note: Be careful when you're cutting and pasting quote marks in the key word list. There are different kinds of quote marks that look almost the same but are not the same. The keywords text box is looking for the default vertical quote marks and not the fancier angled quote marks. If you get this wrong then the rule may not match!

Step 4: Set the confidence level. In this case I have set a 100% confidence level because we don't have multiple levels of matching rules and it won't be used in this case. For character proximity I have used 300 characters, which means the key words have to be within 300 characters of the regex pattern match.


Step 5: That's it for creating the sensitivity label.


Step 6: Test the sensitivity label by making a txt document and putting example text in it and uploading it to the test dialog:

Now on to creating the DLP Policy...


Let’s Create the DLP Policy


Log into the https://compliance.microsoft.com/ and open the Data Loss Prevention section and click the "+ Create Policy".

Step 1: I've elected to do this in the new compliance portal. Open the Data Loss Protection section (you may need to select Show All.. at the bottom of the list to see this option) and Create a new policy. Select Custom categories and Custom policy Template.


Step 2: Give it a name:

Step 3: We are just going to use the policy in Teams to stop people sending passwords. On this screen you could also elect to limit the scope of this policy to just help desk and admin staff members to avoid false positives for general users that don't deal with passwords. However in this case, I just left it as All.

Step 4: Select "Create or customise advanced DLP rules"


Step 5: Click "Create rule"


Step 6a: Give it a name and select our previously created Sensitive Info Type for detecting passwords:


Step 6b: Select the Action that you would like taken if a password is found. In this case I am blocking the user from sending the message (what actually happens practically is that the message is sent for a couple of seconds and then replaced with an error message).


Step 6c: I added a policy tip here, however, these don't show up when Teams messages are blocked at the moment. You never know, they might add this in the future so it's worth adding some text here.


Step 6d: I also selected to send an email alert to an angry administrator that will be likely to have some harsh words with the person sending around passwords willy-nilly:


Step 7: Almost finished:

Step 8: Even more almost finished:

Step 9: Yep, finished now:


Let’s Test it Out


What's it look like in practice? Well check this out:


If the user clicks on the "What can I do?" link in the message, they will be able to see details of why the message was blocked and depending on what settings you chose, the DLP policy may have the options to report back that it was incorrectly flagged or to provide a business justification for sending the message:


The user receiving the message will see:


When do DLP Rules Not Work?


Something that you need to be aware of with Teams is that it won’t check for the regex and additional evidence across multiple Teams chat messages. So if someone was to send the password in a separate line, like shown below, it would still send this:


Based on this, don't expect a DLP policy to police people that are trying to get around the system. The expectation is really that your internal users are not deliberately trying to do the wrong thing, but rather, that they have unknowingly done something that they should have tried to avoid.

There is also the potential to block messages where someone was having a legitimate conversation and was not sending a password to someone at all. Here’s an example of people having a conversation that could get blocked by these rules:


The Wrap Up


There it is, if you run a multi-billion dollar social network you too can use DLP to stop your passwords being stored in your Teams channels or chat for eternity by stopping it ever being allowed to be written in the first place. Keep your passwords safe everyone. Till next time.


Read more →

Wednesday 5 August 2020

Avoiding Connection Issues with Skype for Business Online PowerShell

I’ve been doing a deep dive recently on Skype for Business Online PowerShell and the Move-CsUser command for a customer that has a highly secured Skype for Business deployment.  The details about how these commands actually work in practice are not described in much detail in the Microsoft documentation. They give few examples about what the practical requirements are for making these commands work in more complex scenarios. I personally think that this information is critical when you’re trying to transition smoothly to the cloud and can end up being a painful trial-and-error situation without good documentation. As a result, I decided to write up my understanding of the requirements and limitations of getting these modules and commands to work in different circumstances. I'm not going to be documenting how to set up Hybrid as this is pretty well documented. Instead I'll be focused more on the various authentication approaches of the PowerShell module and Move-CsUser command. Here are the areas we’ll cover in this post:

·       Connecting using Skype for Business Online PowerShell (version 7.0.0.0).
·       Connecting using the Move-CsUser command.

Skype for Business Online PowerShell


The Skype for Business Online PowerShell module as of 7.0.0.0 has two methods of authenticating with Office 365 (as opposed to the 6.0.0.0 module which only supported legacy auth). There was also 2 versions of the Online Module that shows as being 7.0.0.0, so it's worth checking that you have the latest version from the download site. The first and original method of connection uses Legacy Auth or Live ID based authentication. The second method of connecting uses a Modern Authentication method using OAuth. The Modern Authentication method supports authenticating with full Multi-Factor Authentication support. The legacy authentication method is not aware of MFA and will fail if you try and connect using an MFA enabled account.

The Anatomy of the Skype for Business Online PowerShell Module Connection

There are several steps that the Skype for Business Online module does in order to set up the connection. Each one of these steps could be the cause of connection failures, so it’s useful to understand what the steps actually are and what can go wrong with them. A good way to understand what phase the connection fails at is to run the New-CsOnlineSession command with the -Verbose flag. When you do that you will see the following steps in a successful connection:

Step
Steps
Comments
1
Determining domain to admin
In this step the PowerShell module tries to determine what the domain is for the admin account being used. There are two ways for this to happen: either it will parse the admin account URI and select the domain after the @ symbol, or you have included the OverrideAdminDomain flag in the New-CsOnlineSession command.
2
AdminDomain = 'myteamslab.onmicrosoft.com'
This step describes the admin account domain that it will use to discover the URI endpoint (e.g. the part after the @ symbol in the admin account name or the OverrideAdminDomain flag value).
3
Discovering PowerShell endpoint URI
The PowerShell module connects to a URI that is specific to the location where the tenant is deployed. In order to find this out the module queries the Lyncdiscover URL based on the specified admin domain: http://lyncdiscover.myteamslab.onmicrosoft.com/?Domain=myteamslab.onmicrosoft.com
Note: If the domain is still pointing to an on-prem/Hybrid Skype for Business deployment this step (in my experience) will fail unless you have specified an online only domain using the OverrideAdminDomain flag (e.g. myteamslab.onmicrosoft.com).
4
TargetUri = 'https://adminau1.online.lync.com/OcsPowershellLiveId'
The module will then parse the response of the LyncDiscover call to find out what the tenant's PowerShell connection URI is, which it refers to as the TargetUri. In this case it's https://adminau1.online.lync.com/OcsPowershellLiveId

Note: If you already know what this is you can specify it on the New-CsOnlineSession command using the TargetUri flag which will allow the previous steps to be bypassed.
5
Requesting authentication token
The module will then authenticate and retrieve a token which it will use for the session. To do this (when using the OAuth method) it will sent a HTTP POST to https://login.microsoftonline.com/common/oauth2/token to retrieve a token. If this step fails, a good way to test it is to open up Internet Explorer and try to log into https://portal.office.com and see if you can get through the login steps from the browser on the machine you’re connecting from.
6
Initializing remote session
After authenticating and retrieving a token it will try to setup the PowerShell connection.
At this point I have seen issues with Proxies. All the previous connections seem to automatically use the Proxy settings that are set in the Control Panel > Internet Options > Connection (Tab) > Lan Settings (commonly referred to as the Internet Explorer proxy settings). However, at this point when the PowerShell module is attempting to connect it does not use the Proxy settings by default. If you see the connection fail here and you know that there is a Proxy being used you need to ensure that you include SessionOption flag on the New-CsOnlineSession command which is described in greater depth below.

Below is an example of these step shown in a working connection (using Legacy Auth) when the Verbose flag is being used:

PS > Import-Module SkypeOnlineConnector
PS > $cred = Get-Credential

cmdlet Get-Credential at command pipeline position 1
Supply values for the following parameters:
Credential
PS > $session = New-CsOnlineSession -Credential $cred -Verbose
VERBOSE: Determining domain to admin
VERBOSE: AdminDomain = 'myteamslab.onmicrosoft.com'
VERBOSE: Discovering PowerShell endpoint URI
VERBOSE: TargetUri = 'https://adminau1.online.lync.com/OcsPowershellLiveId'
VERBOSE: Requesting authentication token
VERBOSE: Success
VERBOSE: Initializing remote session
VERBOSE: Success
PS > Import-PSSession $session -AllowClobber

ModuleType Version    Name                                ExportedCommands
---------- -------    ----                                ----------------
Script     1.0        tmp_1rjupt3z.xju                    {Clear-CsOnlineTelephoneNumberReservation, ConvertTo-JsonF...


The Two Authentication Methods


The two methods for Authentication are shown in their basic form below:

Basic Legacy Auth Method (when using a non-hybrid Skype for Business domain admin account):

This is the basic form of the commands when you are connecting using an admin account (domain name) that has lyncdiscover records that point online (i.e. a non-Hybrid Skype for Business domain).

Import-Module SkypeOnlineConnector
$cred = Get-Credential
$session = New-CsOnlineSession -Credential $cred -Verbose
Import-PSSession $session -AllowClobber


Basic Legacy Auth Method (When using an admin account where the domain portion is a Hybrid Skype for Business domain)

The command below uses the OverrideAdminDomain setting in order to bypass the requirement to use the lyncdiscover query string shown in Step 3 of the connection process. For the OverrideAdminDomain, I suggest you use the onmicrosoft domain for your tenant because this always points online (and will always work):

Import-Module SkypeOnlineConnector
$cred = Get-Credential
$session = New-CsOnlineSession -Credential $cred -OverrideAdminDomain myteamslab.onmicrosoft.com -Verbose
Import-PSSession $session -AllowClobber


Modern Authentication Method

The Modern Authentication method is triggered when you don’t include the -Credential flag in the New-CsOnlineSession command. It’s also recommended to use the OverrideAdminDomain setting here and specify the onmicrosoft domain of your online tenant. The Modern Auth method supports MFA and federation based authentication so you can use it with basically any type of admin account (on prem, online, with or without MFA).

Import-Module SkypeOnlineConnector
$session = New-CsOnlineSession -Verbose -OverrideAdminDomain myteamslab.onmicrosoft.com
Import-PSSession $session –AllowClobber

After running the Modern Authentication New-CsOnlineSession command you will see a Modern Authentication window that you will use to enter your credentials:


Dealing with Web Proxies

If the machine that you’re on requires web proxy settings in Internet Options (e.g. the Internet Explorer proxy settings) in order to access the internet, then you will need to add some extra Session Options to the connection commands. The SessionOptions flag in combination with the ProxyAccessType of IEConfig will allow the Remote PowerShell session to use the IE Proxy settings when connecting. Keep this in mind when you’re dealing with servers behind proxies.

Import-Module SkypeOnlineConnector
$proxySettings = New-PSSessionOption -ProxyAccessType IEConfig
$session = New-CsOnlineSession -Verbose -SessionOption $proxySettings -OverrideAdminDomain myteamslab.onmicrosoft.com
Import-PSSession $session –AllowClobber

Note: If your proxy has any kind of interactive authentication process for connecting through it (for example Basic Auth challenge) then the connection will likely fail. If this is the case you need to set up a whitelist in the proxy for the server to get through without being asked to authenticate.


Online Module Disconnection Issues

The Online Module only remains connected for 60 minutes by default, however, If you plan on being connected for longer than this then you will want to use a new command in conjunction with the connection commands documented above. The command is Enable-CsOnlineSessionForReconnection and Randy Chapman has a good write up about it over at his blog here: https://ucstatus.com/2019/11/25/skypeonlineconnector-session-reconnection/


My Rules for using the Skype for Business Online PowerShell Module (7.0.0.0):

·       If the authenticating admin account has a domain (e.g. admin@<domain.com>) with lyncdiscover DNS records that point to an on-prem Skype for Business deployment (e.g. Hybrid Skype for Business) then you need to use the OverrideAdminDomain flag with an online only domain name (i.e. the onmicrosoft domain e.g. myteamslab.onmicrosoft.com)
·       The Legacy Authentication method (with Credential flag) will not work for MFA accounts with the Skype for Business Online PowerShell module. (Note: This is not the case with the Move-CsUser command which bypasses MFA when using Legacy Auth mode)
·        If you have proxy settings specified in your Control Panel > Internet Options (i.e. the old Internet Explorer Proxy settings) then you need to use the “New-PSSessionOption -ProxyAccessType IEConfig” setting to force the Remote PowerShell session to use the proxy.


Move-CsUser Command


The command used to move users from on premises Skype for Business server to the cloud is not part of the Skype for Business Online PowerShell Connector module. It’s actually part of the on-premises SkypeForBusiness PowerShell module and behaves a bit differently than the Online PowerShell module. To use this command you need both on premises credentials and Online credentials.

The On-prem credentials requires the following Skype for Business RBAC role:

·       CsAdministrator

The specific online permissions that you need the following credentials:

·       Skype for Business Online Administrator
·       User Administrator – Note: This is required because the command needs permissions to query the user’s current licences to see if it has the correct licences to function correctly when moved to online. If this check fails then the whole command will fail to run.
·       OR Global Administrator

When the move command runs, it checks that the user being moved online has been given appropriate licensing so that when they move online they have the matching level of functionality that they had on premises. There are a couple of different licences that it checks when doing this:

·       If you’re moving the user to Skype for Business (i.e you have not specified the MoveToTeams flag in the Move command) then it will check if the user has a licence with Skype for Business (Plan 2) enabled. If not it will give an error.
·       If you’re using the MoveToTeams flag then the user requires a Teams licence in Office 365 or the Move command will give an error.
·       If the user is determined to be using On Premises Dial-In conferencing then the Move command will look for an Audio Conferencing licence to be assigned to the user. If you want to bypass this check you can use the BypassAudioConferencingCheck flag.
·       If the user is enabled for Enterprise Voice on premises then it will check if they have a Phone System licence assigned in the cloud. You can also bypass this check by using the BypassEnterpriseVoiceCheck flag on the Move command.

You’ll note there isn’t a bypass flag for having a Skype for Business or Teams licence. You need to ensure that you’ve assigned your licences prior to moving users. Also keep in mind that just because someone has an E5 licence doesn’t mean that these sub-licences are enabled on the account.

Before running this command you need to determine what the hosted migration service URL will be for your tenant (this bypasses the auto-discovery process for domains currently in Skype for Business Hybrid mode that have Autodiscover records that point on-prem). This has the same starting component to the URL that the Online module uses for the TargetUri. You can discover this using the following command from the Skype for Business Server PowerShell module:

PS > Get-CsOnlinePowerShellEndpoint -TargetDomain myteamslab.onmicrosoft.com | select-object Host

Host
----
adminau1.online.lync.com

The command above will run the lyncdiscover process to find the host portion of the hosted migration URL.
or alternatively, another method is to use the following procedure:

The value of the hosted migration override URL is a variant of the following URL: https://adminXX.online.lync.com/HostedMigration/hostedmigrationService.svc
In the above URL, replace the XX with either two or three characters, determined as follows:

·        In a Skype for Business Online PowerShell session, run the following cmdlet:
Get-CsTenant|ft identity
·        The resulting value will be in the following format:
OU=<guid>,OU=OCS Tenants,DC=lyncXX001,DC=local
·        The two- or three-digit code is the XX contained in the section DC=lyncXX001. If it’s a two-character code, it will be a digit followed by a number (such as 0a). If it’s a three-character code, it will be two letters followed by a digit (such as jp1). In all cases, you’ll see 001 immediately after the XX code.

The Move-CsUser command, as of Skype for Business 2015 CU8 and all versions of Skype for Business 2019, now supports both Legacy Authentication as well as Modern Authentication based OAuth authentication methods. The Modern Authentication method requires that you include the -useOAuth flag when running the command and will allow you to do full MFA based authentication when connecting to Office 365. This is the recommended version to use moving forward because the Legacy method is likely to get deprecated at some stage in the future.

Basic Legacy Authentication Method

The legacy authentication method is supported by all version of Lync 2013 and Skype for Business that supported Hybrid connectivity. I recommend that you specify the HostedMigrationOverrideUrl or otherwise the command will do the lyncdiscover steps for every user being moved, which is just going to make the moving of users take longer and potentially have more steps that could fail.

$cred=Get-Credential
$url="https://adminau1.online.lync.com/HostedMigration/hostedmigrationService.svc"
Move-CsUser -Identity blake.hybrid@myteamslab.com -Target sipfed.online.lync.com -MoveToTeams -Credential $cred -HostedMigrationOverrideUrl $url –Verbose


Modern Authentication Method (OAuth)

The OAuth method is supported from version Skype for Business 2015 CU8 onwards and all versions of Skype for Business 2019. This is the recommended way to authenticate when you’re using versions that support it. Note the use of the UseOAuth flag to make this work. I recommend that you specify the HostedMigrationOverrideUrl or otherwise the command will do the lyncdiscover steps for every user being moved, which is just going to make the moving of users take longer and potentially have more steps that could fail.

$url="https://adminau1.online.lync.com/HostedMigration/hostedmigrationService.svc"
Move-CsUser -Identity blake.hybrid@myteamslab.com -Target sipfed.online.lync.com -MoveToTeams -HostedMigrationOverrideUrl $url -UseOAuth –Verbose

After running the OAuth method you will see a Modern Authentication window that you will use to enter your credentials:


TIP: Don’t Try and Run the OAuth method command via Remote PowerShell

You need to run this command directly on a server with the Skype for Business On-prem PowerShell Module installed. You cannot run the modern authentication method via a Remote PowerShell connection (which will be used for sites that are properly taking advantage of on-prem RBAC levels). If you try and run the Move command using the OAuth method you will get an error because the command will try and open the Modern Auth window on the server that you are remotely connected to and that will fail.

In addition to this, when you’re using Remote PowerShell the server Proxy settings do not seem to get used when you’re connecting. Be aware that this is another failure mode for this type of connection.

My Rules for using the Move-CsUser command to move users online:

·       If the account you’re authenticating with is not an onmicrosoft domain, then you need to use the HostedMigrationOverrideUrl flag.
·       Don’t specify the Credential flag and user the UseOAuth flag to use Modern Authentication to connect. This will support MFA and federation authentication methods. 
·       The Legacy Authentication method (with Credential flag) can actually be used for accounts with MFA assigned to them. The connection endpoint in O365 seems to currently bypass any MFA authentication. However, this may get deprecated at some point in the future, so don’t bank on it to be around forever.
·       Make sure when using OAuth that the IE security settings are not stopping the authentication window from rendering or working correctly.


Be careful of the Internet Explorer Security settings

Note: This applies for both the Online PowerShell module connection and the Move User command.

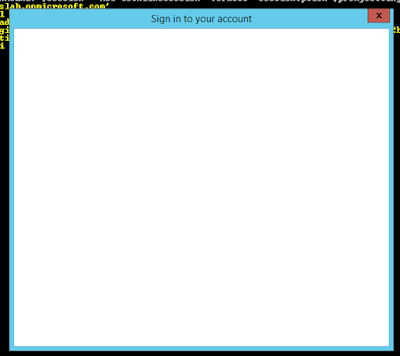
In many cases, servers being used to run these commands will be heavily secured and have a lot of Group Policies locking them down. One of the issues here is that if Internet Settings have been locked down too much then the webview that’s used to display the authentication screen may not render. When this happens you end up with a white window like this:


Depending on how locked down the server is, you may or may not be able to see the Internet Settings Security Tab. In the case of this kind of issue, the settings are likely locked down to the “High” level for the Internet Zone - like this:


If you are able to switch these settings back to the Medium-High setting then the Authentication window should start working again:


Cookies settings can also be an issue. Check that you have cookies allowed:


The Wrap Up


I hope this guide provides you with some more information about the details of using the Skype for Business these PowerShell commands. If you have any feedback, feel free to post below. Enjoy!


Read more →

Popular Posts