Showing posts with label Powershell. Show all posts

Friday, 28 February 2025

Microsoft Places Viewer

I’ve been playing around a bit recently with Microsoft Places configuration. I’ve found viewing the Places configuration in PowerShell to be a bit cumbersome. The configuration has a degree of hierarchy built into it and when you list it up in PowerShell as objects, and you are required to match all the ParentIds yourself, it's quite painful. To try and help with this, I created a little PowerShell script that allows you to view your PlacesV3 config in a clearer tree format.


Microsoft Places Viewer

Microsoft Places Viewer is simple to use tool for viewing your Microsoft Places configuration. It allows you to connect and list the current Microsoft Places data and display it in a hierarchical tree format:


If there are rooms or spaces that don’t have parents associated with them, the tool will display them under the "Orphaned Items" tree node. This allows you to easily troubleshoot the rooms and spaces that are not configured correctly in your tenancy. When you click on any of the nodes on the tree the properties for that object will be displayed on the right hand side of the screen. This allows you to easily check your configuration for each object.


DOWNLOAD FROM GITHUB


Version 1.00 – Initial Release.

Version 2.00 – Editing Capabilities Added.

  • Create Buildings, Floors, Sections, and Desks via right-click in the object tree or the dropdown menu using the "Create New" button.
  • Delete Buildings, Floors, Sections, and Desks by right-clicking on an object in the tree.
  • Edit attributes of Buildings, Floors, Sections, and Desks using the "Edit Value" button for editable fields. If you want to know what the attributes do, check out this blog post: https://www.myteamslab.com/2025/03/microsoft-place-settings.html
  • View and manage Individual Desks (in addition to Workspace/Space objects).
  • Individual Desks are now displayed in grey, and Desk Pools (Workspaces) appear in blue for easier differentiation.

Version 2.01 - Enhancements

  • When adding a Section using the Create New button the Floor selection dialog, the Floor combo box also includes the building name.
  • Updated the section drop down loading method for in the Add Desk dialog to improve performance.
  • Updated the error message when adding a desk with an Mailbox Email Address that doesn't exist or is not of Desk Type.

How to Run the Tool

The tool runs on top of PowerShell 7, which is also a prerequisite for the Microsoft Places PowerShell module. To install the Places PowerShell module, do the following:

Note: If you don't have PowerShell 7 installed you will need to do this first. Get it here: https://learn.microsoft.com/en-us/powershell/scripting/install/installing-powershell-on-windows


Step 1: If you don’t already have the Microsoft Places PowerShell Module installed, do the following:

Run PowerShell 7 as Administrator (Right Click on the App > Select "Run as administrator"):


Step 2: Run the following PowerShell command to install the Microsoft Places PowerShell module:

Install-Module -Name MicrosoftPlaces -Force


Step 3: Download a copy of the Microsoft Places Viewer tool from Github. Before running the script you may need to “Unblock” it in the Windows file properties. To do this, right click on the file and open the Properties window. In the General tab there is a Check Box marked as “Unblock”. You need to check this box:


Step 4: Run the script in the PowerShell 7 window:

Note: You can’t use the Right Click and Run with PowerShell option as this will likely execute it using PowerShell 5, which is not supported.

Change directory to the directory containing the script (change the path to the folder where the script is on your PC):

cd "C:\Users\Name\Documents\CoolScripts"


Run the script. You should see the Microsoft Places Viewer GUI appear:

.\MicrsosoftPlacesViewer-1.00.ps1


Step 5: Click the Connect button:

A browser window will now pop up asking for credentials. Enter the credentials for your M365 tenancy in the browser window and sign in:


Step 6: Click the Get Data button:


Individual Desks vs Desk Pools (Workspace/Space)


Exchange PowerShell and Places PowerShell both include a "Desk" object, which represents an individual desk designed for one person. This differs from workspaces or spaces, which are configured to represent multiple desks based on a specified capacity.

Note: Microsoft use a confusing variety of words to describe these things which take some getting used to. Workspaces which contain multiple desks can  be described as workspaces, spaces, or desk pools.


Individual Desk Creation

Individual Desks are created in Exchange as a resource account with the Type “Desk”. Here is an example of the configuration:


Add a Desk:

New-Mailbox -Room -Alias Desk5 -Name "Desk5" | Set-Mailbox -Type Desk

To integrate an Exchange Desk account with Places, create a Desk object within the Places configuration. You can use the Microsoft Places Viewer tool to accomplish this with the following steps:

Select Desk as the type of object to create and click the Create New button.


After clicking "Create New," a dialog box will appear for you to complete. To link the Places configuration to the Exchange configuration, enter the Desk resource account's email address in the "Mailbox Email Address" field.


After completing these steps, the Individual Desk will appear in the Exchange version of the Places Finder. While it is expected to show up in the Teams App Places Finder in the future, this feature is not yet available.


Currently, in the Outlook Places Finder, an Individual Desk looks like this:

1. Open your calendar and select the location icon.

2. The Places Card will be displayed.

3. Click the “Book Now” link button to proceed.


The Outlook Desk booking interface will appear (note that this is different from the Places Desk Finder):


You may need to select "Browse more on Places Finder," which will display additional available Desk locations, including both Individual Desks and Desk Pools (Workspaces).


Desk Pools (Workspace/Space) Creation

For Desk Pools (also known as Workspaces or Spaces), the object created in Exchange is of the "Workspace" type. The "Enforce Capacity" flag must be set to true on the account. Below is an example of the configuration:

New-Mailbox -Room -Alias Deskpool06 -Name "Desk Pool 6" | Set-Mailbox -Type Workspace

Set-CalendarProcessing -Identity Deskpool06 -EnforceCapacity $True


After some time (usually a few hours), the workspace object from Exchange will appear in the Places configuration. In the Microsoft Places Viewer tool, it will be listed as a Desk Pool (Space) object under the Orphaned Items tree section. To enable users to utilize the Desk Pool in Places, a ParentId must be assigned to it in Microsoft Places.


At this point, you can use the Microsoft Places Viewer tool to configure the Capacity and ParentId for the Desk Pool. Follow these steps to set the Capacity on the Desk Pool:


Enter the number of people that the space will support:


 Edit the ParentId on the Desk Pool:


 Add the ParentId of the section object that you want the Desk Pool to be associated with:


Now that the Desk Pool will have the ParentId and will move underneath the Section that you selected:


After this is done, the Desk Pool will start showing up in the Microsoft Places Desk Finder.


The Wrap Up

I hope you’ve enjoyed your stay at this place, reading about places and how to better place yourself for success within the Places ecosystem. May the place be with you in every place you go. 🖖


Read more →

Thursday, 1 December 2022

Teams PowerShell Module - Certificate Authentication

There are several ways to get the Teams PowerShell module to authenticate against Azure in order to get access to running Teams PowerShell in your Tenancy. Most people will be used to using the interactive method, where you just run the basic Connect-MicrosoftTeams command and get an interactive Azure auth screen that pops up and you enter your user account details into. This is fine if you are manually connecting and doing this by hand. However, what if you want to run an Azure Function that needs to authenticate automatically each time it executes? Well, for that you want to use an application authentication method.

Currently as of the module version 4.9.1, Microsoft officially supports two methods for application authentication when connecting to the Teams PowerShell module:

  • Certificate based authentication – In this method you have a certificate with private and public keys. The PC connecting to Azure needs to have a copy of the private key and Azure needs to have a stored copy of the public key. As part of the connection the private key will be used to sign the connection and if Azure can decrypt the information with the public key then the PC is trusted to connect. This essentially makes the private key like a password that you need to ensure that no one else has access to.
  • Token based authentication – The token-based method requires that you set up a Client Secret in Azure. When you connect to Azure using the PowerShell module, you authenticate against the Token Service using the Client Secret and get Tokens back that you can use to connect to the service. In the case of the Teams module, you need to get two tokens to be able to run all the commands. You can find out more about this option here: Token Auth Post

In this post we are going to focus on the certificate-based authentication method. Here are the steps for setting up and connecting using certificate-based authentication:


Step 1: Generate a Certificate:

The good news here is that the certificate you need does not need to be signed by an internet-based Certificate Authority. You can simply create a self-signed certificate on a PC and use this for connection. Below is a PowerShell command you can run (you must run the PowerShell window as Administrator to execute it). The most important flag in the command is the KeySpec flag which tells it to generate a certificate that can be used for Key Exchange.

New-SelfSignedCertificate -certstorelocation cert:\localmachine\my -Subject TeamsAppTestCertificate01 -KeySpec KeyExchange


Step 2: Export the Certificate:

In order to export the certificate you can either run PowerShell or do it by hand with the Certificate Snap-in. Both options will be detailed below. Choose the one that you’re most comfortable with.

Export the Private Key (This step is only needed if you want to run PowerShell from a different machine that you have created the certificate on, for example, a Function App, etc):

PowerShell:

$password = ConvertTo-SecureString -String "SpecialPassword123!" -Force –AsPlainText

Export-PfxCertificate -Cert "cert:\LocalMachine\My\8E4CKSHDUSG873F66D99AC7935F53" -FilePath "C:\temp\AuthPrivateKey.pfx" -Password $password

Note: The thumbprint to be used here will be output from the New-SelfSignedCertificate command you previously ran.


Or Windows UI:

Once again, this is is only needed if you want to run PowerShell from a different machine that you have created the certificate on, for example, a Function App, etc.

Search PC for mmc.exe > File Menu > Add or Remove Snap-in > Certificates > Add > Computer Account > Personal > Certificates Folder > Right Click on the Certificate > Export…

Export Certificate Wizard:

Click Next...


Select: "Yes, export the private key":


Go with the default export options:


Enter a password for the PFX file and ensure that you select TripleDES-SHA1 (I have found that importing on some platforms is not supported with AES):


Enter a name and location for the pfx file to be output to:


Export the Public Key (to be uploaded to the App Registration in Azure)

PowerShell:

Export-Certificate -Cert "Cert:\LocalMachine\My\8E4CKSHDUSG873F66D99AC7935F53" -FilePath "C:\temp\AuthPublicKey.cer"

Or Windows UI:

Click Next... 


Do not export private key:

Select the format of the file (DER is okay in this case) and click next:


Select the name of the file and click next:


Step 3: Configure the App Registration:

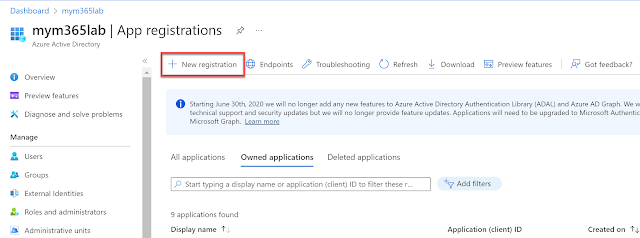
Open the Azure AD Portal and select the Azure Active Directory > App Registration section:

 Click the "New Registration" Button:


Fill in a name for the application and click the Register button:


The App Registration will now be created, however, there is still more config to do:


Go to the “Certificates & secrets” blade:


Select the location of the public key certificate that you exported earlier. Add a description and click OK:


The certificate should now show up in the certificates area:


Now open the API Permissions tab within the App Registration, Click "Add a permission":


You will need to add the following Graph API permissions to the App Registration:

User.Read.All

Group.ReadWrite.All

AppCatalog.ReadWrite.All

TeamSettings.ReadWrite.All

Channel.Delete.All

ChannelSettings.ReadWrite.All

ChannelMember.ReadWrite.All

These permissions are documented by Microsoft here, so you may want to check to see if there have been any updates for the PowerShell version you're using: https://learn.microsoft.com/en-us/microsoftteams/teams-powershell-application-authentication


Click the "Microsoft Graph" option:


Select "Application Permissions":

Select the permissions that were listed above:


Ensure that you have added all the permissions. If you missed any then repeat the above steps for all the permissions in the list…


After adding all the permissions, you need to click the “Grant admin consent for <tenant id>” button on the main Permissions screen:


At the end of this procedure, you should have the following permissions all assigned with admin consent granted:


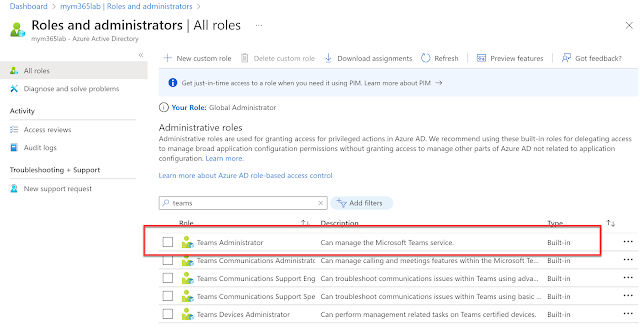
In a final twist in this adventure, you also need to make sure you assign Teams Administrator privileges to the App Registration in order for it to be able to run CS commands. You do this by going to the Active Directory tab > Roles and Administrators > Teams Administrator Role:


Assign the Service Permission that is named the same as your App Registration to the RBAC Role:


Connecting To Teams PowerShell


Now that all the backend work has been done we can get down to doing some connecting. When you connect it needs to be from a machine that has access to the certificate. On a PC this means it has to be in the certificate store. If it’s from a machine in Azure there are various methods for doing this too (which I may well get to in another post…).

You will need to know the ApplicationId that was given to the App Registration in Azure. You can find this out by looking going to the Overview tab and looking for the GUID that has the title “Application (client) ID”. The TenantId is the base domain name that was first given to your tenancy when it was created or alternatively can be the GUID that’s in the Overview tab named as “Directory (tenant) ID” (both options will work).


Teams Module Connect Command:

Connect-MicrosoftTeams -CertificateThumbprint "3ab0e057bc3278ecb2a33123042e5a7a8001ff8c" -ApplicationId "319d0a47-9a48-45b0-b416-14aca00e7ece" -TenantId contoso.onmicrosoft.com


When connection is successful, you’ll get back an object displayed in the PowerShell window that tells you the Account, Environment, Tenant and TenantId values. From here you should be able to run almost all of the commands from the module, with the following exclusions:

As of 4.9.1; All cmdlets are supported now, except for the cmdlets mentioned below:

  • New-Team
  • [Get|Set|New|Sync]-CsOnlineApplicationInstance
  • *-CsUserCallingSettings
  • *-CsUserCallingDelegate
  • *PolicyPackage*
  • *-CsTeamsShiftsConnection*
  • *-CsBatchTeamsDeployment*


The Wrap Up


Congratulations, you’re now an expert at certificate-based authentication with the Teams PowerShell module. If you are interested in Token Based Authentication using the Teams Module, then you can check out my post on that over here: Token Auth Post.


Read more →

Teams PowerShell Certificate or Token Based Auth WinRM Error

I ran into an issue the other day that was difficult to troubleshoot due to the obscure error that arose. The scenario: I was attempting to use Certificate or Token based Authentication to do an application-based authentication with Azure (instead of the regular interactive password based authentication).

After setting everything up and connecting to Teams PowerShell, there was a persistent error any time a Skype for Business *Cs* command was run. The error referenced the WinRM client not being able to process the request. Here’s the error in question:


PowerShell Error:

PS C:\> Connect-MicrosoftTeams -CertificateThumbprint "897a047bc435843b2a32126544e5a7a8001fee8c" -ApplicationId "216d0455-8988-45b0-b425-222ca02e8ede" -TenantId contoso.onmicrosoft.com


Account                              Environment Tenant                               TenantId

-------                              ----------- ------                               --------

219d0455-8988-45b0-b425-222ca01e8ece AzureCloud  6364a50-c3d7-4eee-834c-21a2371df363 6364a50-c3d7-4eee-834c-21a237...

PS C:\> Get-CsOnlineUser

2022-11-22T23:02:46Z [Error] ERROR: Connecting to remote server api.interfaces.records.teams.microsoft.com failed with the following error message : The WinRM client cannot process the request. The authentication mechanism requested by the client is not supported by the server or unencrypted traffic is disabled in the service configuration. Verify the unencrypted traffic setting in the service configuration or specify one of the authentication mechanisms supported by the server. To use Kerberos, specify the computer name as the remote destination. Also verify that the client computer and the destination computer are joined to a domain. To use Basic, specify the computer name as the remote destination, specify Basic authentication and provide user name and password. Possible authentication mechanisms reported by server: For more information, see the about_Remote_Troubleshooting Help topic.


From the error it seemed like an issue on the client side to do with the method being used to authenticate or communicate with the cloud endpoint on the client side… However, after exhaustively chasing down anything to do with the client side WinRM settings, nothing was working… This was on the latest 4.9.1 Teams PowerShell module which in its release notes listed application authentication as being made GA (https://learn.microsoft.com/en-us/microsoftteams/teams-powershell-release-notes). As a result, it’s not likely there was a bug in the module that meant that all *CS* commands just didn’t work...

At this point I looked to the cloud. When configuring application-based authentication for the Teams PowerShell module, you need to set up an App Registration and assign it permissions and RBAC roles to allow it to access Teams. In the deployment I was working on, the following permissions were assigned:


The documentation (https://learn.microsoft.com/en-us/microsoftteams/teams-powershell-application-authentication) from Microsoft says that the following settings were required:

User.Read.All

Group.ReadWrite.All

AppCatalog.ReadWrite.All

TeamSettings.ReadWrite.All

Channel.Delete.All

ChannelSettings.ReadWrite.All

ChannelMember.ReadWrite.All

Note: For the record, you also need to assign the Teams Administrator RBAC role to the Application Service Principal in the Roles and Administrators area (but this wasn’t the issue in this case).

It appears that all of these permissions were included. So it should be fine, right?


….Wrong.


What I found out was that the “Skype and Teams Tenant Admin API” permissions that were included here were to blame for the error. After removing and revoking both of the innocuous “Skype and Teams Tenant Admin API” permissions, I was able to connect and run *CS* commands to my heart's desire…


So to anyone who says “you can never have too many permissions” it appears that you actually can... 

Note: There may be other permissions that also cause this to happen, so make sure you haven't assigned more permissions than are required.


The Solution


Remove the offending “Skype and Teams Tenant Admin API” permissions:


Once removed, the permissions get demoted into the "Other permissions granted for <tenant name>" area, where you need to then "Revoke all admin consents" before they will be fully removed:


After this you should have these permissions left:


After this, you shouldn't get the WinRM error anymore when running CS commands! 

Be sure that you have applied the Teams Administrator RBAC role to the App Registration Service Principal as well. Go to: Azure Active Directory > Roles and administrators > Teams Administrator > Add Assignments Button > Search for your App Registration Name and assign it:


The Wrap Up


I hope that helped out a few of you poor people banging your head against the wall about the WinRM error situation. If you want to check out a full walk through of setting up Certificate or Token based Authentication with the Teams PowerShell Module, check out these posts:

Certificate-based Authentication post

Token-based Authentication post

See ya next time!


Read more →

Wednesday, 5 August 2020

Avoiding Connection Issues with Skype for Business Online PowerShell

I’ve been doing a deep dive recently on Skype for Business Online PowerShell and the Move-CsUser command for a customer that has a highly secured Skype for Business deployment.  The details about how these commands actually work in practice are not described in much detail in the Microsoft documentation. They give few examples about what the practical requirements are for making these commands work in more complex scenarios. I personally think that this information is critical when you’re trying to transition smoothly to the cloud and can end up being a painful trial-and-error situation without good documentation. As a result, I decided to write up my understanding of the requirements and limitations of getting these modules and commands to work in different circumstances. I'm not going to be documenting how to set up Hybrid as this is pretty well documented. Instead I'll be focused more on the various authentication approaches of the PowerShell module and Move-CsUser command. Here are the areas we’ll cover in this post:

·       Connecting using Skype for Business Online PowerShell (version 7.0.0.0).
·       Connecting using the Move-CsUser command.

Skype for Business Online PowerShell


The Skype for Business Online PowerShell module as of 7.0.0.0 has two methods of authenticating with Office 365 (as opposed to the 6.0.0.0 module which only supported legacy auth). There was also 2 versions of the Online Module that shows as being 7.0.0.0, so it's worth checking that you have the latest version from the download site. The first and original method of connection uses Legacy Auth or Live ID based authentication. The second method of connecting uses a Modern Authentication method using OAuth. The Modern Authentication method supports authenticating with full Multi-Factor Authentication support. The legacy authentication method is not aware of MFA and will fail if you try and connect using an MFA enabled account.

The Anatomy of the Skype for Business Online PowerShell Module Connection

There are several steps that the Skype for Business Online module does in order to set up the connection. Each one of these steps could be the cause of connection failures, so it’s useful to understand what the steps actually are and what can go wrong with them. A good way to understand what phase the connection fails at is to run the New-CsOnlineSession command with the -Verbose flag. When you do that you will see the following steps in a successful connection:

Step
Steps
Comments
1
Determining domain to admin
In this step the PowerShell module tries to determine what the domain is for the admin account being used. There are two ways for this to happen: either it will parse the admin account URI and select the domain after the @ symbol, or you have included the OverrideAdminDomain flag in the New-CsOnlineSession command.
2
AdminDomain = 'myteamslab.onmicrosoft.com'
This step describes the admin account domain that it will use to discover the URI endpoint (e.g. the part after the @ symbol in the admin account name or the OverrideAdminDomain flag value).
3
Discovering PowerShell endpoint URI
The PowerShell module connects to a URI that is specific to the location where the tenant is deployed. In order to find this out the module queries the Lyncdiscover URL based on the specified admin domain: http://lyncdiscover.myteamslab.onmicrosoft.com/?Domain=myteamslab.onmicrosoft.com
Note: If the domain is still pointing to an on-prem/Hybrid Skype for Business deployment this step (in my experience) will fail unless you have specified an online only domain using the OverrideAdminDomain flag (e.g. myteamslab.onmicrosoft.com).
4
TargetUri = 'https://adminau1.online.lync.com/OcsPowershellLiveId'
The module will then parse the response of the LyncDiscover call to find out what the tenant's PowerShell connection URI is, which it refers to as the TargetUri. In this case it's https://adminau1.online.lync.com/OcsPowershellLiveId

Note: If you already know what this is you can specify it on the New-CsOnlineSession command using the TargetUri flag which will allow the previous steps to be bypassed.
5
Requesting authentication token
The module will then authenticate and retrieve a token which it will use for the session. To do this (when using the OAuth method) it will sent a HTTP POST to https://login.microsoftonline.com/common/oauth2/token to retrieve a token. If this step fails, a good way to test it is to open up Internet Explorer and try to log into https://portal.office.com and see if you can get through the login steps from the browser on the machine you’re connecting from.
6
Initializing remote session
After authenticating and retrieving a token it will try to setup the PowerShell connection.
At this point I have seen issues with Proxies. All the previous connections seem to automatically use the Proxy settings that are set in the Control Panel > Internet Options > Connection (Tab) > Lan Settings (commonly referred to as the Internet Explorer proxy settings). However, at this point when the PowerShell module is attempting to connect it does not use the Proxy settings by default. If you see the connection fail here and you know that there is a Proxy being used you need to ensure that you include SessionOption flag on the New-CsOnlineSession command which is described in greater depth below.

Below is an example of these step shown in a working connection (using Legacy Auth) when the Verbose flag is being used:

PS > Import-Module SkypeOnlineConnector
PS > $cred = Get-Credential

cmdlet Get-Credential at command pipeline position 1
Supply values for the following parameters:
Credential
PS > $session = New-CsOnlineSession -Credential $cred -Verbose
VERBOSE: Determining domain to admin
VERBOSE: AdminDomain = 'myteamslab.onmicrosoft.com'
VERBOSE: Discovering PowerShell endpoint URI
VERBOSE: TargetUri = 'https://adminau1.online.lync.com/OcsPowershellLiveId'
VERBOSE: Requesting authentication token
VERBOSE: Success
VERBOSE: Initializing remote session
VERBOSE: Success
PS > Import-PSSession $session -AllowClobber

ModuleType Version    Name                                ExportedCommands
---------- -------    ----                                ----------------
Script     1.0        tmp_1rjupt3z.xju                    {Clear-CsOnlineTelephoneNumberReservation, ConvertTo-JsonF...


The Two Authentication Methods


The two methods for Authentication are shown in their basic form below:

Basic Legacy Auth Method (when using a non-hybrid Skype for Business domain admin account):

This is the basic form of the commands when you are connecting using an admin account (domain name) that has lyncdiscover records that point online (i.e. a non-Hybrid Skype for Business domain).

Import-Module SkypeOnlineConnector
$cred = Get-Credential
$session = New-CsOnlineSession -Credential $cred -Verbose
Import-PSSession $session -AllowClobber


Basic Legacy Auth Method (When using an admin account where the domain portion is a Hybrid Skype for Business domain)

The command below uses the OverrideAdminDomain setting in order to bypass the requirement to use the lyncdiscover query string shown in Step 3 of the connection process. For the OverrideAdminDomain, I suggest you use the onmicrosoft domain for your tenant because this always points online (and will always work):

Import-Module SkypeOnlineConnector
$cred = Get-Credential
$session = New-CsOnlineSession -Credential $cred -OverrideAdminDomain myteamslab.onmicrosoft.com -Verbose
Import-PSSession $session -AllowClobber


Modern Authentication Method

The Modern Authentication method is triggered when you don’t include the -Credential flag in the New-CsOnlineSession command. It’s also recommended to use the OverrideAdminDomain setting here and specify the onmicrosoft domain of your online tenant. The Modern Auth method supports MFA and federation based authentication so you can use it with basically any type of admin account (on prem, online, with or without MFA).

Import-Module SkypeOnlineConnector
$session = New-CsOnlineSession -Verbose -OverrideAdminDomain myteamslab.onmicrosoft.com
Import-PSSession $session –AllowClobber

After running the Modern Authentication New-CsOnlineSession command you will see a Modern Authentication window that you will use to enter your credentials:


Dealing with Web Proxies

If the machine that you’re on requires web proxy settings in Internet Options (e.g. the Internet Explorer proxy settings) in order to access the internet, then you will need to add some extra Session Options to the connection commands. The SessionOptions flag in combination with the ProxyAccessType of IEConfig will allow the Remote PowerShell session to use the IE Proxy settings when connecting. Keep this in mind when you’re dealing with servers behind proxies.

Import-Module SkypeOnlineConnector
$proxySettings = New-PSSessionOption -ProxyAccessType IEConfig
$session = New-CsOnlineSession -Verbose -SessionOption $proxySettings -OverrideAdminDomain myteamslab.onmicrosoft.com
Import-PSSession $session –AllowClobber

Note: If your proxy has any kind of interactive authentication process for connecting through it (for example Basic Auth challenge) then the connection will likely fail. If this is the case you need to set up a whitelist in the proxy for the server to get through without being asked to authenticate.


Online Module Disconnection Issues

The Online Module only remains connected for 60 minutes by default, however, If you plan on being connected for longer than this then you will want to use a new command in conjunction with the connection commands documented above. The command is Enable-CsOnlineSessionForReconnection and Randy Chapman has a good write up about it over at his blog here: https://ucstatus.com/2019/11/25/skypeonlineconnector-session-reconnection/


My Rules for using the Skype for Business Online PowerShell Module (7.0.0.0):

·       If the authenticating admin account has a domain (e.g. admin@<domain.com>) with lyncdiscover DNS records that point to an on-prem Skype for Business deployment (e.g. Hybrid Skype for Business) then you need to use the OverrideAdminDomain flag with an online only domain name (i.e. the onmicrosoft domain e.g. myteamslab.onmicrosoft.com)
·       The Legacy Authentication method (with Credential flag) will not work for MFA accounts with the Skype for Business Online PowerShell module. (Note: This is not the case with the Move-CsUser command which bypasses MFA when using Legacy Auth mode)
·        If you have proxy settings specified in your Control Panel > Internet Options (i.e. the old Internet Explorer Proxy settings) then you need to use the “New-PSSessionOption -ProxyAccessType IEConfig” setting to force the Remote PowerShell session to use the proxy.


Move-CsUser Command


The command used to move users from on premises Skype for Business server to the cloud is not part of the Skype for Business Online PowerShell Connector module. It’s actually part of the on-premises SkypeForBusiness PowerShell module and behaves a bit differently than the Online PowerShell module. To use this command you need both on premises credentials and Online credentials.

The On-prem credentials requires the following Skype for Business RBAC role:

·       CsAdministrator

The specific online permissions that you need the following credentials:

·       Skype for Business Online Administrator
·       User Administrator – Note: This is required because the command needs permissions to query the user’s current licences to see if it has the correct licences to function correctly when moved to online. If this check fails then the whole command will fail to run.
·       OR Global Administrator

When the move command runs, it checks that the user being moved online has been given appropriate licensing so that when they move online they have the matching level of functionality that they had on premises. There are a couple of different licences that it checks when doing this:

·       If you’re moving the user to Skype for Business (i.e you have not specified the MoveToTeams flag in the Move command) then it will check if the user has a licence with Skype for Business (Plan 2) enabled. If not it will give an error.
·       If you’re using the MoveToTeams flag then the user requires a Teams licence in Office 365 or the Move command will give an error.
·       If the user is determined to be using On Premises Dial-In conferencing then the Move command will look for an Audio Conferencing licence to be assigned to the user. If you want to bypass this check you can use the BypassAudioConferencingCheck flag.
·       If the user is enabled for Enterprise Voice on premises then it will check if they have a Phone System licence assigned in the cloud. You can also bypass this check by using the BypassEnterpriseVoiceCheck flag on the Move command.

You’ll note there isn’t a bypass flag for having a Skype for Business or Teams licence. You need to ensure that you’ve assigned your licences prior to moving users. Also keep in mind that just because someone has an E5 licence doesn’t mean that these sub-licences are enabled on the account.

Before running this command you need to determine what the hosted migration service URL will be for your tenant (this bypasses the auto-discovery process for domains currently in Skype for Business Hybrid mode that have Autodiscover records that point on-prem). This has the same starting component to the URL that the Online module uses for the TargetUri. You can discover this using the following command from the Skype for Business Server PowerShell module:

PS > Get-CsOnlinePowerShellEndpoint -TargetDomain myteamslab.onmicrosoft.com | select-object Host

Host
----
adminau1.online.lync.com

The command above will run the lyncdiscover process to find the host portion of the hosted migration URL.
or alternatively, another method is to use the following procedure:

The value of the hosted migration override URL is a variant of the following URL: https://adminXX.online.lync.com/HostedMigration/hostedmigrationService.svc
In the above URL, replace the XX with either two or three characters, determined as follows:

·        In a Skype for Business Online PowerShell session, run the following cmdlet:
Get-CsTenant|ft identity
·        The resulting value will be in the following format:
OU=<guid>,OU=OCS Tenants,DC=lyncXX001,DC=local
·        The two- or three-digit code is the XX contained in the section DC=lyncXX001. If it’s a two-character code, it will be a digit followed by a number (such as 0a). If it’s a three-character code, it will be two letters followed by a digit (such as jp1). In all cases, you’ll see 001 immediately after the XX code.

The Move-CsUser command, as of Skype for Business 2015 CU8 and all versions of Skype for Business 2019, now supports both Legacy Authentication as well as Modern Authentication based OAuth authentication methods. The Modern Authentication method requires that you include the -useOAuth flag when running the command and will allow you to do full MFA based authentication when connecting to Office 365. This is the recommended version to use moving forward because the Legacy method is likely to get deprecated at some stage in the future.

Basic Legacy Authentication Method

The legacy authentication method is supported by all version of Lync 2013 and Skype for Business that supported Hybrid connectivity. I recommend that you specify the HostedMigrationOverrideUrl or otherwise the command will do the lyncdiscover steps for every user being moved, which is just going to make the moving of users take longer and potentially have more steps that could fail.

$cred=Get-Credential
$url="https://adminau1.online.lync.com/HostedMigration/hostedmigrationService.svc"
Move-CsUser -Identity blake.hybrid@myteamslab.com -Target sipfed.online.lync.com -MoveToTeams -Credential $cred -HostedMigrationOverrideUrl $url –Verbose


Modern Authentication Method (OAuth)

The OAuth method is supported from version Skype for Business 2015 CU8 onwards and all versions of Skype for Business 2019. This is the recommended way to authenticate when you’re using versions that support it. Note the use of the UseOAuth flag to make this work. I recommend that you specify the HostedMigrationOverrideUrl or otherwise the command will do the lyncdiscover steps for every user being moved, which is just going to make the moving of users take longer and potentially have more steps that could fail.

$url="https://adminau1.online.lync.com/HostedMigration/hostedmigrationService.svc"
Move-CsUser -Identity blake.hybrid@myteamslab.com -Target sipfed.online.lync.com -MoveToTeams -HostedMigrationOverrideUrl $url -UseOAuth –Verbose

After running the OAuth method you will see a Modern Authentication window that you will use to enter your credentials:


TIP: Don’t Try and Run the OAuth method command via Remote PowerShell

You need to run this command directly on a server with the Skype for Business On-prem PowerShell Module installed. You cannot run the modern authentication method via a Remote PowerShell connection (which will be used for sites that are properly taking advantage of on-prem RBAC levels). If you try and run the Move command using the OAuth method you will get an error because the command will try and open the Modern Auth window on the server that you are remotely connected to and that will fail.

In addition to this, when you’re using Remote PowerShell the server Proxy settings do not seem to get used when you’re connecting. Be aware that this is another failure mode for this type of connection.

My Rules for using the Move-CsUser command to move users online:

·       If the account you’re authenticating with is not an onmicrosoft domain, then you need to use the HostedMigrationOverrideUrl flag.
·       Don’t specify the Credential flag and user the UseOAuth flag to use Modern Authentication to connect. This will support MFA and federation authentication methods. 
·       The Legacy Authentication method (with Credential flag) can actually be used for accounts with MFA assigned to them. The connection endpoint in O365 seems to currently bypass any MFA authentication. However, this may get deprecated at some point in the future, so don’t bank on it to be around forever.
·       Make sure when using OAuth that the IE security settings are not stopping the authentication window from rendering or working correctly.


Be careful of the Internet Explorer Security settings

Note: This applies for both the Online PowerShell module connection and the Move User command.

In many cases, servers being used to run these commands will be heavily secured and have a lot of Group Policies locking them down. One of the issues here is that if Internet Settings have been locked down too much then the webview that’s used to display the authentication screen may not render. When this happens you end up with a white window like this:
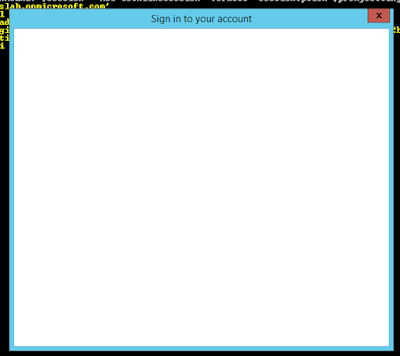


Depending on how locked down the server is, you may or may not be able to see the Internet Settings Security Tab. In the case of this kind of issue, the settings are likely locked down to the “High” level for the Internet Zone - like this:


If you are able to switch these settings back to the Medium-High setting then the Authentication window should start working again:


Cookies settings can also be an issue. Check that you have cookies allowed:


The Wrap Up


I hope this guide provides you with some more information about the details of using the Skype for Business these PowerShell commands. If you have any feedback, feel free to post below. Enjoy!


Read more →

Popular Posts