

Microsoft Teams now has the ability to limit the network bandwidth used by calls/meetings based on the network location of the user. This uses a feature called Network Roaming Policy. I have found the documentation relating to this feature to be a bit lacking from Microsoft, so I’ve put together this post to go into some more detail about how the policy works.
This feature is an extension of the existing Meeting Policy
settings that have always been available for Teams. I wrote an extensive post
about how Meeting Policy bandwidth control works over at this post (https://www.myteamslab.com/2019/10/microsoft-teams-bandwidth-usage-deep.html).
The Network Roaming policy has the same effect on the Teams client. However, it's now dynamically implemented by the client based on its location, rather than it always being on in the previous Meeting Policy implementation. This means that if you have a specific
site that you know has low bandwidth constraints, then you can limit the maximum
bandwidth per call and also restrict video usage for this site location only.
How Does the Policy Work?
The Network Roaming Policy is based on network IP Addressing of the client machine and the NATed IP Address of the client as it access the Internet. This relies on the configuration of both the Trusted IP Address ranges and Network Site subnets within the Teams Admin Centre. The client will compare both its local subnet and its public IP address (NATed address that it accesses the Internet through, e.g. Type “What's my IP” into Google) in order to know if it will implement the Network Roaming policy. The diagram below shows two different sites with different LAN Address ranges as well as different internet egress IP Addresses through the Internet facing firewall:

Note: The policy is not just based on the IP Address of the user because you could have multiple sites with the same internal private IP Address range. The Trusted IP (Public IP) must also match for the policy to be implemented by the client.
In the configuration example we will configure a Network Roaming policy for the "Low Bandwidth Site" on the left hand side of the diagram. The site on the right hand side will not be configured and will fall back to having the default bandwidth settings used for Teams.
Importantly, the only clients that currently support the Network Roaming policy at the moment are the Windows and MacOS desktop clients. So don’t expect this to work with Teams Phones, MTRs, or Linux clients.
Configuration of Network Roaming Bandwidth Policy
Note: In classic cloud style, you will usually need to wait about 24 hours before this policy takes effect. As a result, make sure you're not in any kind of rush when setting this up.
Network Roaming Policy is configured under the Locations > Network Topology section of the Teams Admin Centre:

The Network Topology section consists of 3 tabs - Network Sites, Trusted Sites and Roaming Policy. You will need to configure all of these areas in order for Network Roaming Policy to work. For this example we will configure a policy that will limit the Teams client to only use a maximum of 300kbps worth of bandwidth for its Audio and Video streams.
Step 1. Start by creating a Network Roaming Policy from the Roaming Policy tab, select Add:

Step 2. Configure the policy with the required bandwidth per call and whether or not video will be supported (for more details about how much bandwidth is used for video calls, see my previous post here: https://www.myteamslab.com/2019/10/microsoft-teams-bandwidth-usage-deep.html):

Step 3. Select the Trusted IPs tab and click the Add button:

Step 4. The trusted IP Address is the external facing NATed IP address that Office 365 will see as the source address coming from your client connection. If you search for “What's my IP” on Google from the location it will tell you what this IP Address is. In the case of connecting to Office 365 there are likely a range of IP Addresses used here, so you need to get the Network Mask correct.


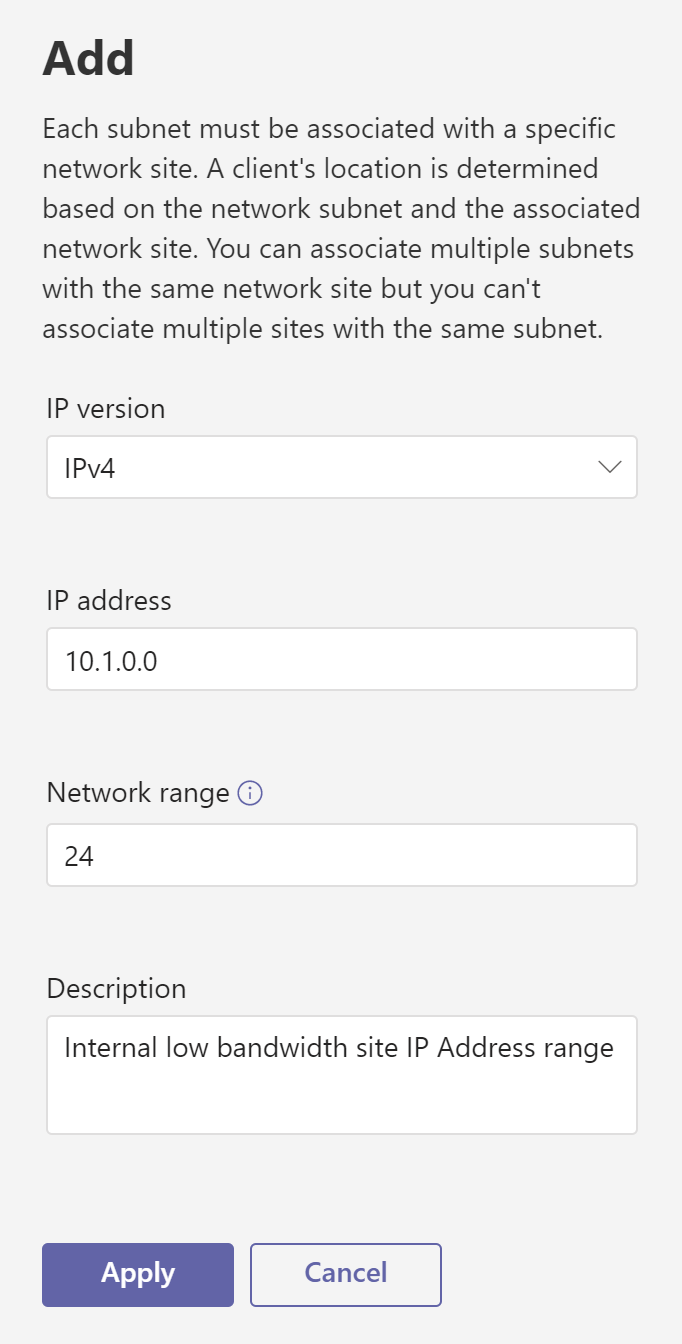
Each subnet that is used internally at the site should be added to the Site by clicking the Add Subnets button:
Step 6: In addition to the Network Location configuration above, you also need to turn on Network Configuration Lookup in Meeting Policy:

Within the Meeting policy you need to ensure that the following setting is enabled:

The Microsoft Docs (https://learn.microsoft.com/en-us/microsoftteams/network-roaming-policy) say the following:
“To enable the network roaming
policy for users who are not enterprise voice enabled, you must also enable the
AllowNetworkConfigurationSettingsLookup setting in TeamsMeetingPolicy. This
setting is off by default.”
So really, it’s best that you always turn this on if you
want the Network Roaming Policy to take effect for everyone.
How do you know if the policy is working?
The client doesn’t display anything to the user to inform
them that this policy is in use. The only way you can really tell is by looking
into the Teams Client logs. You can get the client to output the logs by
pressing the Ctrl + Alt + Shift + 1 keys on your keyboard. When
this is done the client will output log files to your Downloads folder. From
here you open up the following file:
Downloads\MSTeams
Diagnostics Log <Date>\web\ MSTeams Diagnostics Log
<Date>_calling.txt
This file contains information about if the client has matched any of the existing policies.
When the policy is not being applied you will find something
like this indicating that the default policy is in use:
"
networkRoamingPolicy": {
" allowIPVideo "
: true ,
"mediaBitRateKb"
: 50000,
"policyDocument ":
"Default "
When the Network Roaming policy has been successfully
deployed you should see the Network Roaming Policy section of the file display information about the policy that the client is implementing. Importantly, the trustedIpMatchInfo and siteMatchInfo sections must say that they have "Matched" one of the policies.
Current MT location
response:
{
"emergencyCallingPolicy": {
"policyDocument":
"Default"
},
"emergencyCallRoutingPolicy": {
"emergencyNumbers": [],
"policyDocument":
"Default"
},
"networkRoamingPolicy": {
"allowIPVideo": true,
"mediaBitRateKb": 300,
"policyDocument": "TeamsNetworkRoamingPolicy=Tenant:300kbps"
},
"endpointNetwork": "Trusted",
"networkSiteId": "Low Bandwidth Site",
"enableLocationBasedRouting": false,
"siteAddress":
"Low Bandwidth Site",
"subnetId": "10.1.0.0",
"debugInfo": {
"ncsDebugInfo": {
"trustedIpMatchInfo": {
"publicIp": "50.1.2.100",
"trustedIpAddress":
"50.1.2.100",
"maskBits": 24,
"reason": "Matched",
"_comment": "Match
Client Public IP to Tenant Trusted IP"
},
"siteMatchInfo": {
"ipv4": "10.1.0.180",
"subnetLengthIPv4": "24",
"subnetId": "10.1.0.0",
"maskBits": 24,
"networkSiteId": "Low Bandwidth Site",
"enableLocationBasedRouting":
false,
"reason": "Matched",
"_comment": "Used to
match endpoint subnet to Tenant site if trustedIpMatchInfo matches"
},
"networkLocationMatchInfo": {
"bssid":
"74-ac-b9-2e-f3-b3",
"ipv4": "10.1.0.180",
"reason":
"NotMatched",
"_comment": "Used to
find emergency address,against Tenant Location Network Information (LIS),
otherwise against Client Geo Location Information (CLS) if available"
}
},
"mtDebugInfo": {
"isDirectRoutingOnlyUser":
true,
"emergencyCallingPolicyTag":
"Default",
"emergencyCallRoutingPolicyTag": "Default",
"networkRoamingPolicyTag":
"TeamsNetworkRoamingPolicy=Tenant:300kbps",
"emergencyCallingPolicyAssignedTo": "Tenant or Host
Global",
"emergencyCallRoutingPolicyAssignedTo": "Tenant or Host
Global",
"networkRoamingPolicyAssignedTo":
"Network Site",
"ncsResponseReceived": true,
"correlationId": "1DEF3C2C47D64C1EB7060657876ECE95"
}
}
}
The Wrap Up
Awesome - now you can walk up to random people on the street and tell them about how you know all about Teams Network Roaming Policy. Believe me, they will be thrilled to hear all the details. Especially the bit about the AllowNetworkConfigurationSettingsLookup setting. That one really cracks them up. Cheers, Enjoy!


