
 19
comments
19
comments
Note: The Polycom VVX Manager Version 3 has now been updated to Poly Phone Manager 4 available here: https://www.myteamslab.com/2022/08/poly-phone-manager-4.html
Polycom’s VVX range of phones on Lync/Skype for Business
have come a long way in the past few years. The release of version 5.4 has
delivered further improvements and new features and moved them into a position of superiority over even Lync Phone Edition devices. Since version 5.4 of VVX software there has been support for remote
management features by way of a RESTful web service interface. The VVX Phone Manager takes advantage of this API and allows you to remotely execute various functions of the devices. As of version 3.0 there is also now support for phones that are directly registered to Skype for Business Online!
Polycom VVX Manager Version 3 Features
 |
| Polycom VVX Phone Manager 3 |
Skype for Business Online Support - The VVX Phone Manager as of version 3.0 can now list up users from Skype for Business Online and discover their VVX/Trio devices using the Network IP Discover method (supports users with VVX's and Common Area Phone Devices). The "Connect SfBO" button will connect the PowerShell session to SfB Online. You will need to enter your Office 365 AAD username and credentials to connect. Once connected a green "Online" label will be displayed next to the button and the button’s text will change to "Disconnect SfBO" which you can click to disconnect from SfB Online.
Phone discovery – Phones can be discovered either by automatically querying the Lync/Skype for Business Monitoring database (provided there is a monitoring role deployed in the environment) by pressing the “Discover from Monitoring DB” button. Alternatively, this can be done by entering IP Address ranges and “pinging” contiguous subnet ranges for phones using the “Discover from IP Range” button (format: "192.168.0.1-192.168.0.20" OR "192.168.0.0/24" OR add multiple with comma separation "192.168.0.0/24,192.168.1.0/24"). During the discovery process, phones that are logged in to user accounts will be listed in the users list. If the tool finds a VVX handset that is not signed in, it will be added to the user list under the name “VVXNot@LoggedIn_<index number>”. This allows you to use the tool to access these devices even though they are not signed into the system.
Important Note: The VVX Phone Manager Tool uses the registration
database within the Lync/Skype for Business monitoring database to determine
the IP addresses of phones. However, registrations are only added to this database at the time when
a user manually signs in with a PIN or with Domain authentication details. If a user moves a phone to a new subnet or the IP Address changes without signing it out/back in then its new IP Address will not be written to the Monitoring database. So, in some cases, the Monitoring database may not produce a
complete list of registered VVX devices. The "Monitoring DB Query Time" value in the "Settings" dialog can be used to extend how far back the Monitoring DB query will go to find VVX registrations. This can help to find phones that haven't been manually signed in for an extended period of time. Or alternatively, the "Discover from IP Range" option can be used to do an exhaustive scan of all subnets if required.
Export/Import Phone Info – This feature
outputs a CSV file that contains all the Users, IPs, Firmware Version, Serial
Numbers, Lync/Skype for Business Server, and MAC Address (if available) for all
phones. If you select the "More" checkbox you will also get the
additional Lync/Skype for Business policy settings for each user (this is
slower).
Access Web Interface - Access the web
interface of a VVX phone by selecting a user in the user list and clicking the “Web
Config” button. This will automatically load the web browser to the phone's web
interface.
Pin control – The “Pin…” button will
load a dialog that will Set, Test, Lock, Unlock a user’s PIN number.
 |
| PIN Dialog |
Send Text Messages - Send text messages to be displayed on a Polycom VVX phone. An example of this would be to send a
message to warn before a system upgrade or a reboot. Messages are displayed on
the screen for 30 seconds.
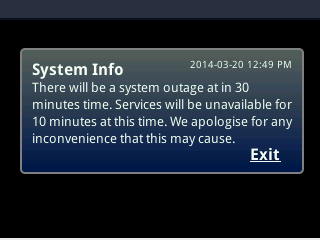 |
| Example of Message Screen |
Get More Info – By pressing the “More
Info” button you can get extended information about a VVX phone including:
Device Info, Call Status, Presence Info, Network Info, Line Info, SIP Status,
Network Statistics.
Reboot/Restart Phones – You have the
choice of Rebooting or Restarting a single, multiple, or All phones.
Reset Config – You have the option to
Reset the Config or Factory Reset the configuration with one or many phones.
Get/Set Config - You can Get or Set any
setting in the phone configuration. You simply need to enter the configuration setting
name (as you would find in the configuration file eg. log.level.change.hset)
and click the Get or Set buttons to view or change the setting's value.
Sign in / Sign out devices (5.7 software required on the phone) - Selecting sign in will open a dialog that allows for either AD Authentication or PIN Authentication. Selecting sign out will sign out the phone from Skype for Business.
Sign in / Sign out devices (5.7 software required on the phone) - Selecting sign in will open a dialog that allows for either AD Authentication or PIN Authentication. Selecting sign out will sign out the phone from Skype for Business.
Dial / End Call – You can choose to
remotely dial a SIP URI (eg. john.smith@domain.com or +61395551111@domain.com) on a phone
by entering a URI and pressing the “Dial” button. If the phone is on a call you
can also choose to end the call using the “End Call” button.
Test FTP Config Server - Test your FTP
Configuration File server by simply entering the IP address of the FTP server
and pressing the “Test FTP” button. The tool will attempt to connect to the FTP
server and download information about key files associated with a Polycom
configuration server deployment. These include the base configuration file
(000000000000.cfg), configuration files in the CONFIG_FILES tag, any MAC
address files associated directly with phones, and firmware files (*.sip.ld).
The tool will give feedback as to the state of the FTP server.
View Screen – The “Screen…” button will
open a dialog that will show you the user's screen. Before the user's screen can be viewed the user must first manually allow access to the Screen Capture feature (this is a security measure so
that the user is aware that someone is viewing their screen). This setting within the Basic->Preferences screen will only be made available while the VVX screen dialog is displayed (the tool automatically makes the setting "up.screenCapture.enabled" in the device to turn on this preference setting). When the dialog
first loads you will see a screen that looks like this:
 |
| VVX Screen Dialog |
At this
point the user will have to enable the following setting in their phone preferences:
Settings -> Basic -> Preferences
-> Screen Capture -> Enabled
Note: In version 2.50 of the tool with Version 5.7 of VVX software this step is not required anymore. The tool will immediately be able to display the screen by using the REST interface to enable the feature.
Now you will
be able to see the user's screen and save screenshots of the screen as JPG files if you so
desire:
 |
| VVX Screen |
Command Line Settings – If you would like to load the script with your own specific settings to save time, you can specify these in the command line when loading the script. The format of the parameters are as follows:
Script command line settings:
.\Skype4B-Lync-PolycomVVXManager3.00.ps1
-WebPortInput 443
-UseHTTPSInput false
-AdminUsernameInput AdminUsername
-AdminPasswordInput AdminPassword
-PushUsernameInput PUSHUsername
-PushPasswordInput PUSHPassword
-IPRangeInput “192.168.0.1-192.168.0.200”
-OnlineUsernameInput john.smith@tenant.onmicrosoft.com
-OnlinePasswordInput "Password"
Settings Dialog – The “Settings…”
button allows you to configure your own passwords, web service port and HTTPS
settings for the tool.
Note: Continue reading
for definitions of these settings.
Bulk PIN Authentication (New in version 2.50)
The bulk PIN authentication feature allows you to sign in
multiple devices (that are currently signed out) using their respective extension and PIN
numbers. This feature is useful for if you are deploying a site and require all
the phones be logged in the day after the cutover before staff arrive at
work. Another scenario might be that you want to sign in new starters phones at the time when you initially set their PIN number to allow them immediate access to their phone.
Phones that are signed out will be displayed in the
interface as “VVXNot@LoggedIn_<IPAddress>”. Any device that is in this
state will be eligible to be displayed within the Bulk PIN Authentication
window when it’s opened. Below is an example of what the Bulk PIN
Authentication window looks like when it’s first opened:

Note: You will need the REST API enabled on devices that you want to be
displayed in the Bulk Authentication interface.
Once the Bulk PIN Authentication window is open you need to assign Extension and PIN numbers to
each device. To do this you can choose to
import a CSV file with this information in it to fill in the table. Or you can
manually do it with the Extension/PIN text fields and Update Row button. Once
you have added Extension and PIN numbers to a row it will change colour to
green. Lines that do not have an Extension and PIN will be ignored when you run
the Bulk Authentication process.
To use the CSV import you need to create CSV file with the
following headers:
MAC Address,Extension,PIN
0004f28038f9,1006,1234
64167f8023b1,1007,1234
0004f280df8b,1008,1234
You will need to know the MAC address of the phone devices
to create the CSV file. So it’s important to have good records describing where devices
are deployed within the organisation.

After Extensions and PIN numbers have been added for the
required devices you click the “Run All” button and the sign in process will
begin. The sign in process runs in parallel for all devices. The tool will poll
the devices to check if the sign in process has completed. Once finished the
results will be reported back for each device in the Result column.

The
results can be exported with the “Export Results...” button in CSV format for
future records.
UPDATES
2.01 Enhancements
- Fixed issue with the Get Config function
- Increased the timeout for discovery ping from 200ms to 350ms to handle sites that might be over a higher latency connection. Also added a setting called "Discovery Wait Time" which allows you to tune the time that the tool will wait for responses from discovery messages sent to phones (setting between 200ms-1000ms).
2.02 Enhancements
- Fixed issue with rescan on CSV import.
- Included new Polycom MAC Address range 64:16:7F
- Added a discovery summary at the end of IP Based discovery. This gives a useful summary when scanning multiple IP ranges.
- The command line input for IPRangeInput now accepts muiltple ranges in comma separated format. eg. Skype4B-Lync-PolycomVVXManager2.02.ps1 -IPRangeInput "192.168.0.1-192.168.0.200,192.168.0.10/24"
2.03 Bug Fix
- There was an issue with detecting users when capital "SIP:" was used as part of their SIP URI. This has been fixed.
- Fixed a couple of typos that affected operation on Powershell 5
- Added more VVX types when discovering logged out phones
- Added port number to screen viewing URL. Required when non-standard HTTP/HTTPS port is used.
- Replaced Invoke-RestMethods with shiny new .net web requests to fix annoying connection issues found in previous versions.
- Added option in Send Message dialog to select the theme/style of the message displayed on the VVX. Default is to send the new SfB dialog style, the original Polycom theme and red/alarm themes are also available.
- Updated Icon to new MySkypeLab icon.
- Added some more detail in blog post about Push configuration.
- Fixed threading issue with discovery that could result in some devices not being listed.
- Added support for RealPresence Trios.
- Added support for VVXs and Trios configured as CsMeetingRoom devices.
- Added Trio Filter checkbox to view only users with Trios.
- When not logged in Trio is discovered it will be displayed as "TrioNot@LoggedIn"
- Fixed discovery Instance name when default SQL instance is used.
- Changed the "VVXNot@LoggedIn_<value>" name to end with the IP Address of the device rather than an incrementing number.
- Fixed the IP Address discovery count text in Powershell window to make more sense
- Fixed issue with listview scrolling and colored lines changing back to black. Clicking on the listview will refresh the colours.
- Increased VVX and Trio list checkbox filter speed.
- Fixed issues with setting and testing pins.
- Fixed issue with config Get and Set not working with https connections
- Fixed issue with LineURI and DialPlan not being outputted in CSV for Common Area Phones and Meeting Room devices
2.50 Fixes and 5.7
API Enhancements (24/1/2018)
Note: The config setting httpd.ta.enabled="1" is
required for the 5.7 features to work correctly
- Added Touch Simulation (Tap/Swipe) when viewing screen on 5.7 software. This works on the range of VVX500, VVX600, VVX400, VVX300 and VVX200 devices (yes, even non-touch screen devices). Simply click on the screen where you would like to send a tap or click and drag to send a swipe command. Note: There is no support for hardware button presses (eg. home button) in the API yet so we will have to wait for full remote control of devices.
- Viewing the screen now does not require user involvement to turn on Screen Capture within the phone preferences in version 5.7. This will automatically be set by the tool each time the screen button is clicked.
- Added additional information when the “More” button is clicked for devices with 5.7 and above (CPU, Memory, Session Information, Additional Call Status info).
- Added Sign in / Sign Out functions (in send command dropdown box) allowing AD Authentication and PIN Authentication - Supported on 5.7 and above. Not supported for Trios.
- Bulk PIN Authentication Sign In. See the Bulk PIN Authentication section of the blog post for more details - Supported on 5.4 and above. Not supported for Trios.
- Corrected issue with VVX Manager failing with virtual IPs from HyperV (Thanks to Ross Gernon for the feedback)
- Added a retry when polling devices during discovery. Some VVXs don't respond to the first NOTIFY message so a second is sent to try and force a response.
- Fixed issue that stopped connections to default MSSQLSERVER instances.
- Many other smaller bug fixes...
- The VVX Phone Manager can now list up users from Skype for Business Online and discover their VVX devices using the Network IP Discovery method (supports users with VVXs/Trios and CAP Devices).
- The "Connect SfBO" button will connect the PowerShell session to SfB Online. You will need to enter your Office 365 username and password to connect. Once connected a green "Online" label will be displayed next to the button and the button’s text will change to "Disconnect SfBO" which you can click to disconnect from SfB Online.
- Two new command line attributes added for SfB Online Username and Password so you can connect without being prompted for credentials (example: .\Skype4B-Lync-PolycomVVXManager3.00.ps1 -OnlineUsernameInput john.smith@tenant.onmicrosoft.com -OnlinePasswordInput "Password")
- Cleaned up the info display and changed font and added some colour. Now includes information about where a user is Homed (OnPrem or Online) and Hosted VM (HostedVoicemailPolicy) fields.
- Added support for testing HTTP/HTTPS config servers (Test Server Button). Files are now downloaded into memory so no file has to be written to disk and checks for VVX250,350,450 firmware. Trio firmware and APP_FILE_PATH_Trio8800 path now supported.
- Rewrote user information gathering code to be cleaner and work with SfB Online.
- Removed exit button from messages sent to VVX400
- Many other bug fixes :)
3.01 Trio discovery
and fix update (25/10/2018)
- Trios in later versions do not support NOTIFY based discovery anymore. Added automatic REST based fall back for discovery of these devices.
- If REST is disabled on a Trio that falls back to REST discovery, a device named TrioRestDisabled@<IP Address> will be added to the list and you can then use the "Web Config" button to enable REST (Settings > Applications > REST API > Enable).
- When Visual+ is discovered it will be added to the list as TrioVisualPlus@<IP Address> and you will be able to access the web interface with the "Web Config" button.
- Fixed Trio screen display size by halving the size to fit on regular screen resolutions.
- Made updates to the Import CSV logic to properly handle Trios.
- Improvements with reconnecting to O365 after connection timeout. (Thanks to Greig Sheridan for helping with the testing of this release)
- Added MFA support when signing into O365.
Polycom VVX Manager Configuration Requirements
Firmware Requirements
The VVX phone must be at least firmware version 5.4 in order to be
controlled by the VVX Phone Manager Tool because this version is the first to
support the new REST based management API. If you select a user that has
a phone with an older version of software, the tool will display a warning
in the Powershell window and give you limited access to features for that user. Note: software version 5.4.0A is required for VVXs connecting to Skype for Business.
VVX Web Server Settings
Since version
5.1 of VVX software, there have some increased security enhancements added to the phones. This increased security will
affect your ability to connect to the web interface and web services interface of VVX devices when you are
running them in an out-of-the-box configuration. So in order to use this tool you will need to edit some basic configuration settings on
your phones (usually done via configuration files).
The
following web server settings were added in version 5.1 VVX firmware:
|
Web Config Mode |
httpd.cfg.enabled |
httpd.cfg.secure TunnelEnabled |
httpd.cfg.secure TunnelRequired |
|
Disabled |
0 |
0 |
0 |
|
HTTP Only |
1 |
0 |
0 |
|
HTTPS Only |
1 |
1 |
1 |
|
HTTP/HTTPS |
1 |
1 |
0 |
Different combinations of these setting will give you access to either HTTP, HTTPS or both at the same time. Below are examples of how to achieve all of these settings:
Example settings:
Note: The config setting httpd.ta.enabled="1" is also required for the 5.7 features to work correctly.
HTTP Web
access only:
<!-- HTTP Admin Settings -->
<httpd httpd.enabled="1"
httpd.cfg.enabled="1" httpd.cfg.port="80"
httpd.cfg.secureTunnelEnabled="0" />
HTTPS Web
access only:
<!-- HTTPS Admin Settings -->
<httpd httpd.enabled="1"
httpd.cfg.enabled="1" httpd.cfg.secureTunnelPort="443"
httpd.cfg.secureTunnelEnabled="1"
httpd.cfg.secureTunnelRequired="1" />
Both HTTP
and HTTPS web access:
<!—HTTP and HTTPS Admin Settings -->
<httpd httpd.enabled="1"
httpd.cfg.enabled="1" httpd.cfg.port="80"
httpd.cfg.secureTunnelEnabled="1" httpd.cfg.secureTunnelPort="443"
httpd.cfg.secureTunnelRequired="0" />
Note: If
you would like to make the Web Admin harder for people to find, you can change
the port number to something different from the default 80 or 443 settings. If
you do this, you will need to change the Web Port setting in the settings screen
of the tool to match your selected port.
In addition
to enabling the web server in the phone you must also change the default password on the device as well. If
you do not do this the phone will display errors/warnings on the phone display
and web interface (“Default admin password is in use, please contact your
administrator”). Passwords can be configured in the configuration file as
follows:
<!-- Passwords and Security -->
<device
device.auth.localAdminPassword="12345" device.auth.localUserPassword="12345" />
Note: Make
these passwords whatever you want them to be, however, they must be different
than the default of 456 in order to avoid the warning message being displayed
on the phone screen.
After you
have changed these settings the web login and phone screen login passwords will
be changed. So if your support staff have been trained to enter the default
“456” password, don’t forget to tell them that it has changed.
Enable REST API:
Config File Setting:
The following REST API setting must be enabled in order
to use the Polycom VVX Manager Tool:
<apps apps.restapi.enabled="1" />
Web Interface Setting:
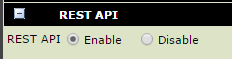 |
| Settings -> Applications -> REST API |
Text Messaging Settings
In order to send messages to VVX phones you need to enable
the Push settings in the configuration. You can do this with the following
settings:
Config File Settings:
<apps.push
apps.push.alertSound="1" apps.push.messageType="5"
apps.push.serverRootURL="push" apps.push.password="vvxmanager"
apps.push.username="vvxmanager" apps.push.secureTunnelEnabled="1" apps.push.secureTunnelPort="443" apps.push.secureTunnelRequired="0"></apps.push>
- apps.push.messageType: This sets the
level of messages that will be displayed for the phone. The VVX Manager
always sets the messages as “critical” so they will always be received. The
setting “5” means that all levels of messages will be displayed by the
phone.
- apps.push.serverRootURL: This
setting needs to be set to "push". This is used as part of the
URI for sending messages to the VVX.
- apps.push.username: The phones use
digest authentication for push connections. The username sent by the tool
by default is “vvxmanager”. This can be changed in the Settings dialog in
the tool.
- apps.push.password: The phones use
digest authentication for push connections. The password sent by the tool by
default is “vvxmanager”. This can be changed in the Settings dialog in the
tool.
- apps.push.alertSound: Play a sound when the message is displayed. This is the standard Polycom sound that you hear when a phone reboots. This can help the user to see the message, as it will only be displayed for 30 seconds.
- apps.push.secureTunnelEnabled: If 0, HTTPS is disabled for push. If 1, HTTPS is enabled for push.
- apps.push.secureTunnelPort: Changes the HTTPS port number (default is 443).
- apps.push.secureTunnelRequired: If 0, HTTPS is not required (ie. HTTP is also available). If 1, HTTPS is required for push (ie. HTTP connection is disabled). Note: if you try to connect using HTTP when this is set to 1 you will receive a "(405) Method Not Allowed" error.
Web Interface Settings:
 |
| Settings -> Applications -> PUSH |
MAC Address Display
If
you want to be able to remotely tell what the MAC address is of a phone (useful
when building phone specific config files) from the VVX Phone Manager tool
interface without having to open the web config, add the following setting:
<device sec.tagSerialNo="1">
<prov
device.prov.tagSerialNo="1"/>
</device>
Polycom VVX Manager Tool Settings
When
connecting from the VVX Phone Manager you need to match the password that you
configured in your phone with the tool. The settings can be entered into the
tool by pressing the “Settings…” button:

- REST Username: This setting is always set to “Polycom”.
- REST Password: This setting needs to match the “device.auth.localAdminPassword” setting in your VVX phone. If the password is wrong and doesn't match your phone setting you will see "(401) Unauthorized" errors being returned from the phone when you try to send it commands.
- PUSH Username: This setting needs to match the “apps.push.username” setting in your VVX phone.
- PUSH Password: This setting needs to match the “apps.push.password” setting in your VVX phone.
- HTTPS: This needs to match your phone's configuration settings for “httpd.cfg.secureTunnelEnabled”
- Web Port: This needs to match your phone's configuration settings for either “httpd.cfg.port” for HTTP or “httpd.cfg.secureTunnelPort” for HTTPS.
- Monitoring DB Query Time: This setting determines how many months back in the monitoring database the tool will look for VVX phone registrations. By default this setting is 6 months, meaning that the IP Address of any VVX phone registered in the past 6 months will be scanned to see if it is still located at that IP Address. This setting can be increased if your VVX phones have not been manually signed out/in for longer than 6 months. Or if you have a site where users are frequently signing in and out of their VVX phones you can reduce this value to save time scanning old IP Addresses for VVXs. The setting can be set between 1-48 months (ie. from 1 month up to 4 years).
- Discovery Wait Time: This setting allows you to tune the time that the tool will wait for responses from discovery messages sent to phones (setting between 200ms-1000ms). This can be helpful if you are trying to discover phones on a distant subnet with a high levels of latency.
SQL Requirements
In VVX Phone
Manager 1.xx there was a requirement that SQL ports were opened on each Front End server for
accessing information on phone IP Addresses (which work some of the time). This new version of the tool only
requires access to the Monitoring database on the Lync / Skype for Business Backend SQL server in order
to discover the IP Addresses of phones signed into the system.
Important Warning About Trio SkypeUSB Mode
Note:
Thanks to Greig Sheridan for providing testing of USB mode!
The Trio devices can run in a special mode
called SypeUSB mode whereby they basically become a dumb USB device that you
connect to a USB port of a PC as an audio device. This mode is turned on using
the base profile setting below:
device.baseProfile="SkypeUSB"
When in this mode the VVX turns off its SIP
stack and will not respond to the VVX phone manager. This renders the device
un-discoverable so you will not be able to see it in the tool. In addition to
this, if you want to convert the device back to the Lync/Skype profile and have
it talking SIP again you should do a full file system reset of the device first.
It was found that factory defaulting the device sometimes isn’t enough to get the
SIP Stack back firing on all cylinders and you might see 404 SIP errors coming
back from Trios when trying to discover them with the VVX Phone Manager.
The moral of the story here being that
SkypeUSB mode does not work with the VVX Phone Manager. So don’t waste a whole
bunch of time trying to figure out debug SkypeUSB mode!
Getting Started with a Polycom VVX Deployment
This article
was written under the assumption that you already have VVX phones deployed, and
you are now looking to manage them. If you need some more help with the initial
deployment part of the process, I can point you to some useful resources:
Jeff
Schertz' great post on the different ways to deploy Polycom phones is here: Provisioning Polycom SIP Phones. Greig Sheridan also has a
nice post on Optimising the Polycom VVX for Lync that you might
want to check out too.
If you would
like to know more about what is supported on Lync with VVX phones and setting
up a FTP server to support Polycom Configuration files on Lync, go to the Polycom VVX support page and grab a copy of the
lovingly entitled: “Deploying Polycom® UC Software for use with Microsoft®
Lync™ Server”.
An important
recommendation that I can give you is to always test your configuration files
on a real phone before deploying them into the wild, because subtle errors
can cause things not to work as desired.
The Wrap Up
Well, that's it, my first version 2.0 script! Enjoy, and let me know if you have any issues, feedback
or have any enhancement requests.


