This blog
is an expansion on the previous Part 1 post here. The process of setting up the
Function App for this part 2 section is the same as was documented in Part 1. I suggest reading part 1 first before moving ahead.
In part 1 we created a Function App that did the following:
- Port monitor a selection of server ports.
- Allow monitoring of several servers.
- Allow for tests to be run on an ongoing basis at configurable intervals.
- If a port was found to be inaccessible then the application must email with details of what is down.
In Part 2
of the series we will expand on the application to do the following:
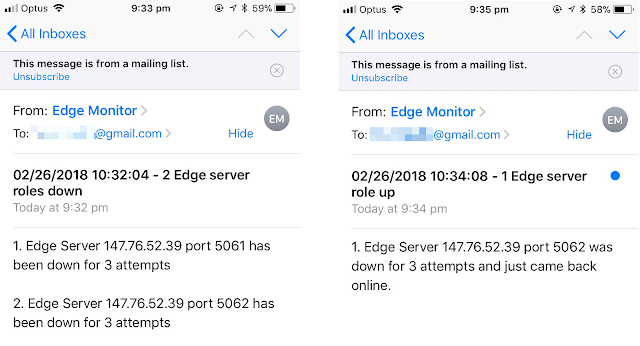
- Allow for coalescing of emails so that multiple errors result in only one email being sent instead of many emails.
- Allow for the application to have a memory so it can only send an email after seeing a configurable number of errors. This is to guard against flapping type scenarios and only to update in the case of a fair dinkum outage.
- In addition to sending an email when ports are down, the app will also send an email to inform that the ports have come back up - we can rest easy in the knowledge that the server recovered without logging in to check.
- Use Azure Storage Tables to store state about the Edge servers.
In order to
give the application a “memory” we need to add some kind of storage to the
application. Fortunately, Azure is very good at offering a bunch of storage
options. We also need to also take into account that we are using Powershell
in this case for the application and need a storage scenario that will work
with Powershell. In this case we only need a fairly basic storage model. The
good news is that there is a nice Powershell module that exists for connecting
to Azure Storage Tables.
Step 1
Download a copy of the Azure Storage
Table module for Powershell. In order to
connect Powershell into the Azure Storage Table datastore, a
Powershell module needs to be used. The module is available on the Powershell Gallery from this
link:
Save a copy
of the module to your PC using the following command:
Save-Module -Name
AzureRmStorageTable -Path “C:\temp\”
This should
have downloaded the following folder structure:
C:\temp\AzureRmStorageTable\1.0.0.21\
Step 2
Get the function app's FTP details from Azure. Now that
the Powershell Module is installed, upload it into a Modules folder in
the Azure Function Applications file storage. To do this use FTP or
sFTP. In this case we will use FTP with the Filezilla client. Some information will be required out of your function applications properties screen.
Settings
are found under the “Platform Features” tab -> Properties
Host = FTP
HOST NAME
FTP
Username = FTP/DEPLOYMENT USER
Step 3 – Configure FTP client
Connect to
the addresses provided using the Function Application Domain formatted
username and Azure Password:
Host: FTP HOST NAME
FTP Username = FTP/DEPLOYMENT USER
Example: “EdgePortTester-Part002\joeb”
FTP Password = <Azure Password>
Enter this
information into the Filezilla Site Manager:
Step 4 – Connect to Azure and Upload Powershell
Module
Now connect
into Azure using the FTP client:
Open the following folders:
/site/wwwroot/TimerTriggerPart002
Create a
folder called “Modules”:
/Site/wwwroot/TimerTriggerPart002/Modules
Now, from
the temp folder where the AzureRmStorageTable module was downloaded, copy this
into the Modules folder. There should be a structure that looks like
this:
/Site/wwwroot/TimerTriggerPart002/Modules/AzureRmStorageTable/1.0.0.20
The Storage Table module for Powershell should now be successfully installed. The next
step is to get the Table Storage connection information out of Azure to allow
for the Powershell module to connect and read/write to the storage that was
automatically created when the Function Application was created.
Step 5 – Get Storage Account Settings
The
Powershell script provided in this post has some
variables that need to be filled out with your own Function App's storage details.
These details can be obtained from the Azure Portal.
In the
Overview screen note down the “Subscription” and “Resource Group” names:
From the
Overview Tab of the Function Application open the “Resource group” link:
Then open
the storage Resource Group that was created automatically for the Function
Application:
Once in
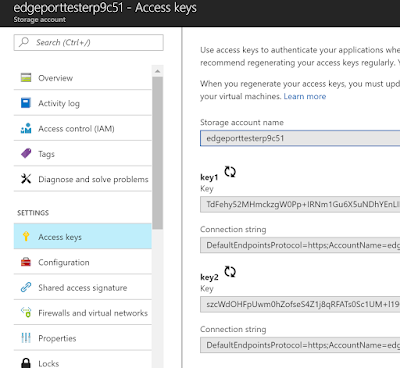
the storage Resource Group, the Access Keys for the application can be seen:
Select Key 1 or Key 2 for use in the script.
Step 6 - Get a copy of the Powershell script
Download a
copy of the Powershell Script.
You can
grab a copy of the script I wrote for doing the port monitoring from here:
Step 7 - Update script parameters
Update the
Storage Account details in the Powershell Script.
Using the setting found in Step 5 you can fill in the Powershell script
variables:
#AZURE
STORAGE VARIABLES######
#SETTINGS
ARE FOUND UNDER PLATFORM FEATURES TAB -> PROPERTIES
$subscriptionName = "Visual
Studio Premium with MSDN" #SUBSCRIPTION NAME
$resourceGroup = "EdgePortTester-Part002" #RESOURCE
GROUP
$storageAccount = "edgeporttesterp8dbf" #STORAGE ACCOUNT NAME
$tableName = "EdgeTesterTablePart2" #CHOOSE A NAME
$partitionKey = "EdgeTesterStoragePart2" #CHOOSE A
NAME
$storageAccountKey = "7asdkjhasd7KHDKJHAS0dsflasdnnlasd099asdpncsdlknclLJSDLjbadksdjbfa9su9duhoasivRqXA615jQ==" #STORAGE
ACCOUNT > ACCESS KEYS
#AZURE
STORAGE VARIABLE END######
Don’t
forget, as in Part 1, to fill in your Mail Jet (see Step 13 from Part 1) email account information. Enter your
Mail Jet API Key (Username) and Secret Key (Password) and paste them into the
following section of the script:
#MAIL
JET USERNAME/PASSWORD#######
$emailUsername = "kjh3k23h4kjhkj37573f8f020879dff7"
$emailPassword = "9898f98fhdjkkdjh46cd418100075a3b"
#EMAIL
ADDRESS TO SEND ERRORS TO
$SENDEREMAIL = "YourRealEmailAddress@domain.com"
$RECIPIENTEMAIL = "YourRealEmailAddress@domain.com"
##################################
Note: Remember to configure the Sender Addresses in Mailjet as detailed in Step 13 of Part 1.
Edit the
Skype for Business Edge server details as required. These are entered as an
array of hash tables. The sections highlighted in yellow can be changed. In
this case the application is monitoring 2 Edge servers, one in Melbourne and
one in Sydney.
Location
|
ServerName
|
ServerRole
|
DestinationPort
|
Protocol
|
Melbourne
|
147.70.50.10
|
Federation
|
5061
|
TCP
|
Melbourne
|
147.70.50.10
|
Access Edge
|
443
|
TCP
|
Melbourne
|
147.70.50.11
|
Web
Conferencing
|
443
|
TCP
|
Melbourne
|
147.70.50.12
|
AV Edge
|
443
|
TCP
|
Sydney
|
147.70.60.20
|
Federation
|
5061
|
TCP
|
Sydney
|
147.70.60.20
|
Access Edge
|
443
|
TCP
|
Sydney
|
147.70.60.21
|
Web
Conferencing
|
443
|
TCP
|
Sydney
|
147.70.60.22
|
AV Edge
|
443
|
TCP
|
Note: The script only supports testing TCP ports at this time.
#SETUP
EACH SERVER
$Records = @(@{"Location" =
"Melbourne"; "ServerName"
= "147.70.50.10";
"ServerRole" = "Federation"; "DestinationPort" = "5061"; "Protocol" =
"TCP"})
$Records += @(@{"Location" =
"Melbourne"; "ServerName"
= "147.70.50.10";
"ServerRole" = "Access Edge";
"DestinationPort" = "443"; "Protocol" =
"TCP"})
$Records += @(@{"Location" =
"Melbourne"; "ServerName"
= "147.70.50.11";
"ServerRole" = "Web Conferencing";
"DestinationPort" = "443"; "Protocol" =
"TCP"})
$Records += @(@{"Location" =
"Melbourne"; "ServerName"
= "147.70.50.12";
"ServerRole" = "AV Edge"; "DestinationPort" = "443"; "Protocol" =
"TCP"})
$Records += @(@{"Location" =
"Sydney"; "ServerName"
= "147.70.60.20";
"ServerRole" = "Federation"; "DestinationPort" = "5061"; "Protocol" =
"TCP"})
$Records += @(@{"Location" =
"Sydney"; "ServerName"
= "147.70.60.20";
"ServerRole" = "Access Edge";
"DestinationPort" = "443"; "Protocol" =
"TCP"})
$Records += @(@{"Location" =
"Sydney"; "ServerName"
= "147.70.60.21";
"ServerRole" = "Web Conferencing";
"DestinationPort" = "443"; "Protocol" =
"TCP"})
$Records += @(@{"Location" =
"Sydney"; "ServerName"
= "147.70.60.22";
"ServerRole" = "AV Edge"; "DestinationPort" = "443"; "Protocol" =
"TCP"})
Step 8 – Parameter Tweaking
This
version of the script has a few settings that can be tweaked. These are how many
failures on each port is required before an email gets sent ($RequiredNumberOfFailuresBeforeEmail).
There is also a setting for consolidating multiple errors or recoveries into a
single email ($consolidateEmailsOnError and $consolidateEmailsOnError). Set
these as you like:
#This
is the number of required port check failures before an email is sent out
$RequiredNumberOfFailuresBeforeEmail = 3
#Send
1 email rather than one per record
$consolidateEmailsOnError = $true
$consolidateEmailsOnRecover = $true
Step 9 - Paste the edited script into the Timer Trigger (run.ps1)
Insert the Powershell script containing your variables into your Function App code window (run.ps1):
Step 10 - Start receiving emails about your server being down
Now kick back and enjoy your own personal Edge monitoring service! Emails should arrive at your inbox informing you of when Edge ports became unreachable.

Note: It may take the script running a couple of times before all the table storage gets setup by the script. So you may see some error the first few times it runs.

Note: It may take the script running a couple of times before all the table storage gets setup by the script. So you may see some error the first few times it runs.
The Wrap Up
There is
Part 2 in the bag. I hope that in addition to helping you monitor your edge
servers, this has been informative and taught you some new skills that might
help in the future when making your own Function Apps.


