Monday, 19 March 2018

Building an Edge Server Port Monitor with Azure Function Apps – Part 2

This blog is an expansion on the previous Part 1 post here. The process of setting up the Function App for this part 2 section is the same as was documented in Part 1. I suggest reading part 1 first before moving ahead.

In part 1 we created a Function App that did the following:
  • Port monitor a selection of server ports.
  • Allow monitoring of several servers.
  • Allow for tests to be run on an ongoing basis at configurable intervals.
  • If a port was found to be inaccessible then the application must email with details of what is down.
In Part 2 of the series we will expand on the application to do the following:
  • Allow for coalescing of emails so that multiple errors result in only one email being sent instead of many emails.
  • Allow for the application to have a memory so it can only send an email after seeing a configurable number of errors. This is to guard against flapping type scenarios and only to update in the case of a fair dinkum outage.
  • In addition to sending an email when ports are down, the app will also send an email to inform that the ports have come back up - we can rest easy in the knowledge that the server recovered without logging in to check. 
  • Use Azure Storage Tables to store state about the Edge servers.

In order to give the application a “memory” we need to add some kind of storage to the application. Fortunately, Azure is very good at offering a bunch of storage options. We also need to also take into account that we are using Powershell in this case for the application and need a storage scenario that will work with Powershell. In this case we only need a fairly basic storage model. The good news is that there is a nice Powershell module that exists for connecting to Azure Storage Tables.


Step 1
Download a copy of the Azure Storage Table module for Powershell. In order to connect Powershell into the Azure Storage Table datastore, a Powershell module needs to be used. The module is available on the Powershell Gallery from this link:


Save a copy of the module to your PC using the following command:
Save-Module -Name AzureRmStorageTable -Path “C:\temp\”

This should have downloaded the following folder structure:
C:\temp\AzureRmStorageTable\1.0.0.21\


Step 2

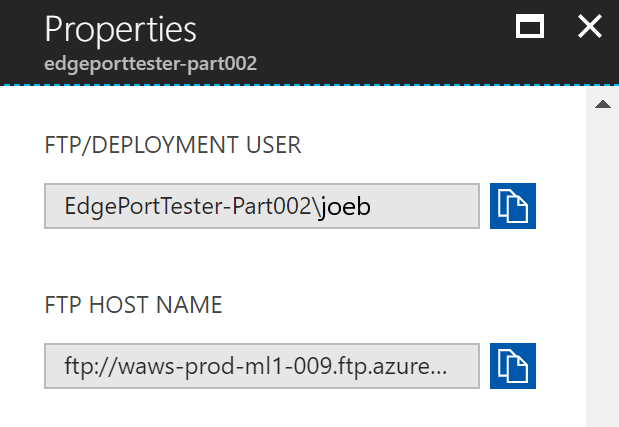
Get the function app's FTP details from Azure. Now that the Powershell Module is installed, upload it into a Modules folder in the Azure Function Applications file storage. To do this  use FTP or sFTP. In this case we will use FTP with the Filezilla client. Some information will be required out of your function applications properties screen.

Settings are found under the “Platform Features” tab -> Properties


Host = FTP HOST NAME
FTP Username = FTP/DEPLOYMENT USER


Step 3 – Configure FTP client
Connect to the addresses provided using the Function Application Domain formatted username and Azure Password:

Host: FTP HOST NAME
FTP Username = FTP/DEPLOYMENT USER
Example: “EdgePortTester-Part002\joeb”
FTP Password = <Azure Password>

Enter this information into the Filezilla Site Manager:


Step 4 – Connect to Azure and Upload Powershell Module
Now connect into Azure using the FTP client:


Open the following folders:
/site/wwwroot/TimerTriggerPart002

Create a folder called “Modules”:
/Site/wwwroot/TimerTriggerPart002/Modules

Now, from the temp folder where the AzureRmStorageTable module was downloaded, copy this into the Modules folder. There should be a structure that looks like this:
/Site/wwwroot/TimerTriggerPart002/Modules/AzureRmStorageTable/1.0.0.20

The Storage Table module for Powershell should now be successfully installed. The next step is to get the Table Storage connection information out of Azure to allow for the Powershell module to connect and read/write to the storage that was automatically created when the Function Application was created.


Step 5 – Get  Storage Account Settings
The Powershell script provided in this post has some variables that need to be filled out with your own Function App's storage details. These details can be obtained from the Azure Portal.  
In the Overview screen note down the “Subscription” and “Resource Group” names:


From the Overview Tab of the Function Application open the “Resource group” link:


Then open the storage Resource Group that was created automatically for the Function Application:


Once in the storage Resource Group, the Access Keys for the application can be seen:

Select Key 1 or Key 2 for use in the script.


Step 6 - Get a copy of the Powershell script
Download a copy of the Powershell Script.

You can grab a copy of the script I wrote for doing the port monitoring from here: 


Step 7 - Update script parameters
Update the Storage Account details in the Powershell Script.

Using the setting found in Step 5 you can fill in the Powershell script variables:
#AZURE STORAGE VARIABLES######
#SETTINGS ARE FOUND UNDER PLATFORM FEATURES TAB -> PROPERTIES
$subscriptionName = "Visual Studio Premium with MSDN"  #SUBSCRIPTION NAME
$resourceGroup = "EdgePortTester-Part002"      #RESOURCE GROUP
$storageAccount = "edgeporttesterp8dbf"       #STORAGE ACCOUNT NAME
$tableName = "EdgeTesterTablePart2"           #CHOOSE A NAME
$partitionKey = "EdgeTesterStoragePart2"      #CHOOSE A NAME
$storageAccountKey = "7asdkjhasd7KHDKJHAS0dsflasdnnlasd099asdpncsdlknclLJSDLjbadksdjbfa9su9duhoasivRqXA615jQ=="             #STORAGE ACCOUNT > ACCESS KEYS
#AZURE STORAGE VARIABLE END######  


Don’t forget, as in Part 1, to fill in your Mail Jet (see Step 13 from Part 1) email account information. Enter your Mail Jet API Key (Username) and Secret Key (Password) and paste them into the following section of the script:
#MAIL JET USERNAME/PASSWORD#######
$emailUsername = "kjh3k23h4kjhkj37573f8f020879dff7"     
$emailPassword = "9898f98fhdjkkdjh46cd418100075a3b"
#EMAIL ADDRESS TO SEND ERRORS TO
$SENDEREMAIL = "YourRealEmailAddress@domain.com"
$RECIPIENTEMAIL = "YourRealEmailAddress@domain.com"
##################################
Note: Remember to configure the Sender Addresses in Mailjet as detailed in Step 13 of Part 1.

Edit the Skype for Business Edge server details as required. These are entered as an array of hash tables. The sections highlighted in yellow can be changed. In this case the application is monitoring 2 Edge servers, one in Melbourne and one in Sydney.
Location
ServerName
ServerRole
DestinationPort
Protocol
Melbourne
147.70.50.10
Federation
5061
TCP
Melbourne
147.70.50.10
Access Edge
443
TCP
Melbourne
147.70.50.11
Web Conferencing
443
TCP
Melbourne
147.70.50.12
AV Edge
443
TCP
Sydney
147.70.60.20
Federation
5061
TCP
Sydney
147.70.60.20
Access Edge
443
TCP
Sydney
147.70.60.21
Web Conferencing
443
TCP
Sydney
147.70.60.22
AV Edge
443
TCP
Note: The script only supports testing TCP ports at this time.

#SETUP EACH SERVER
$Records = @(@{"Location" = "Melbourne"; "ServerName" = "147.70.50.10"; "ServerRole" = "Federation"; "DestinationPort" = "5061"; "Protocol" = "TCP"})
$Records += @(@{"Location" = "Melbourne"; "ServerName" = "147.70.50.10"; "ServerRole" = "Access Edge"; "DestinationPort" = "443"; "Protocol" = "TCP"})
$Records += @(@{"Location" = "Melbourne"; "ServerName" = "147.70.50.11"; "ServerRole" = "Web Conferencing"; "DestinationPort" = "443"; "Protocol" = "TCP"})
$Records += @(@{"Location" = "Melbourne"; "ServerName" = "147.70.50.12"; "ServerRole" = "AV Edge"; "DestinationPort" = "443"; "Protocol" = "TCP"})

$Records += @(@{"Location" = "Sydney"; "ServerName" = "147.70.60.20"; "ServerRole" = "Federation"; "DestinationPort" = "5061"; "Protocol" = "TCP"})
$Records += @(@{"Location" = "Sydney"; "ServerName" = "147.70.60.20"; "ServerRole" = "Access Edge"; "DestinationPort" = "443"; "Protocol" = "TCP"})
$Records += @(@{"Location" = "Sydney"; "ServerName" = "147.70.60.21"; "ServerRole" = "Web Conferencing"; "DestinationPort" = "443"; "Protocol" = "TCP"})
$Records += @(@{"Location" = "Sydney"; "ServerName" = "147.70.60.22"; "ServerRole" = "AV Edge"; "DestinationPort" = "443"; "Protocol" = "TCP"})


Step 8 – Parameter Tweaking
This version of the script has a few settings that can be tweaked. These are how many failures on each port is required before an email gets sent ($RequiredNumberOfFailuresBeforeEmail). There is also a setting for consolidating multiple errors or recoveries into a single email ($consolidateEmailsOnError and $consolidateEmailsOnError). Set these as you like:

#This is the number of required port check failures before an email is sent out
$RequiredNumberOfFailuresBeforeEmail = 3

#Send 1 email rather than one per record
$consolidateEmailsOnError = $true
$consolidateEmailsOnRecover = $true


Step 9 - Paste the edited script into the Timer Trigger (run.ps1)
Insert the Powershell script containing your variables into your Function App code window (run.ps1):


Step 10 - Start receiving emails about your server being down
Now kick back and enjoy your own personal Edge monitoring service! Emails should arrive at your inbox informing you of when Edge ports became unreachable.
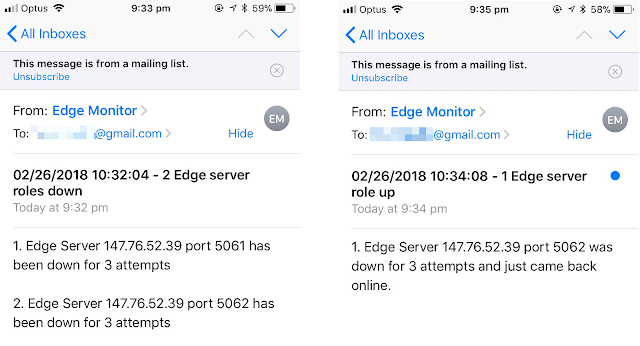
Note: It may take the script running a couple of times before all the table storage gets setup by the script. So you may see some error the first few times it runs.


The Wrap Up

There is Part 2 in the bag. I hope that in addition to helping you monitor your edge servers, this has been informative and taught you some new skills that might help in the future when making your own Function Apps.


Read more →

Thursday, 1 March 2018

Building an Edge Server Port Monitor with Azure Function Apps – Part 1

For this blog series I thought I would branch out a bit and take my Powershell scripting to the next level using Azure Function Apps. What on earth is an Azure Function App, I hear you asking? Well, come in closer around the camp fire and I’ll explain. An Azure Function App is a Serverless application platform. I know that sounds like an oxymoron… An application platform that is serverless! Well, yes, you are correct, there are in fact servers that are running these Function Apps in a nameless data centre somewhere. However, the reason that they are referred to as being “serverless” is that you never have to administer any part of the server hardware or software yourself. You simply write your code and paste it into the Azure Portal and then click the run button….  aannnndd bam! You end up with a very useful application that runs all day, every day, on hardware in a distant land that you never have think about. You just kick back and once a month pay the very reasonable rates offered by Azure. Brilliant!

As a means to teach myself about the Azure Functions platform I decided to give myself a challenge to design a useful application that could run using only Powershell as the programming language. The application I decided to design was an Skype for Business Edge Server port monitoring service. The idea of this application is that it would monitor all the important ports on any number of remote Edge servers and report to me if any of them went down. Due to the number of steps involved in doing this I will be breaking this into 3 separate blog posts.

For part 1 the requirements of the application are as follows:
  • Allow for multiple far end server ports to be monitored.
  • Allow for multiple far end servers to be monitored.
  • Allow for tests to be run on an ongoing basis at configurable intervals.
  • If a port is found to be inaccessible, then the application must email me with details of what is down.
In part 2 of the series I will expand on the application to do the following:
  • Allow for coalescing of emails so that multiple errors result in only one email being sent instead of many emails.
  • Allow for the application to have a memory so it can only send me an email after seeing a configurable number of errors. This is to guard against flapping type scenarios and only to update in the case of a fair dinkum outage.
  • In addition to sending an email when ports are down, it will also send an email to inform me that the ports have come back up - so I can rest easy in the knowledge that the server recovered without logging in to check. 
  • Use Azure Storage Tables to store state about the Edge servers current status.
In part 3 (Coming Soon) of the series I will expand the application to do even more:
  • Save all port test results to Azure Storage tables for later analysis.
  • Use Power Bi to connect to Azure Storage Tables and create nice graphs showing information about the Edge servers over a period of time.

By the end of the series there will be a feature-rich service that allows for the monitoring of remote servers and analyses results in a relatively comprehensive way. This should highlight how powerful Azure Function Apps can be!

Limitations of Powershell Functions


Upfront I should say that Azure Function Apps using Powershell is still considered an “Experimental” language. Whilst I was writing this application I found there are some limitations when coding in Powershell using Function Apps. This list is by no means complete - it’s just some interesting things I noticed:
  • I couldn’t call any commands that requested access to the networking stack. By this I mean commands to query the IP Address of the machine or ports in use, etc. This seems fair given that Function Apps run on shared machines and there is some level of abstraction between the code and the machine it’s running on.
  • I noticed that Invoke-WebRequest would give a warning that requested the use of Basic Parsing due to “The response content cannot be parsed because the Internet Explorer engine is not available, or Internet Explorer's first-launch configuration is not complete. Specify the UseBasicParsing parameter and try again.” This is not a limitation for the functionality in this application but may be something to keep in mind for your future apps.
  • I had a weird issue where function (ie. “function ConnectTCP”) returns would include all of the text from Write-Output commands that executed in the function. I’m not sure if this was a bug or a limitation... Something to look out for though.
  • You need to manually upload additional external powershell modules into the Azure backend. There is no basic “Install-Module” command that can grab code from the Powershell Gallery yet. This can also be problematic if the module attempts to access something that’s not supported by Azure Functions (for example access the networking stack like mentioned earlier).
  • “Write-Host” is not a supported output method like it is in server based Powershell. In order to get output from your script you need to use “Write-Output” which will be written to the Function App log.
  • When sending out port queries I tried to also specify the source port being used, however, it appears that the source port gets NATed on the way out of Azure. So the source port will be random in this case.

Creating the Function App


 Step 1
Open up the Azure Portal and Select “App Services” from the left menu. Then select the “Add” button:


Step 2
Select “Function App” as the type of service app that you would like to create:


Step 3
Click the create button:


Step 4
Fill in the details of the function application. The important parts here are to give your app a unique name, select Windows as the OS and select a Location nearest the servers you would like to be testing.


Step 5
You will need to wait a few minutes for the Function App to be provisioned for you. During this time you will see a “Deploying Function App” icon on the dashboard:


Step 6
Once the Function App has finished deploying, open the app to the Overview tab. Then select “Application settings”:


Step 7
In order for your application to output the correct time information in emails, you need to set the timezone within the “Application settings” to your local timezone. To do this add a row in the “Application settings” called “WEBSITE_TIME_ZONE” and then enter the name of the timezone (eg. “AUS Eastern Standard Time”). You can get a full list of timezones from here: https://msdn.microsoft.com/en-us/library/gg154758.aspx


Don’t forget to click the save button on the Application settings page after making the change:


Step 8
In the main page of the Function App select the “Functions” tab on the left-hand tree. Then click the “New function” button:


Step 9
You will now be presented with a screen that allows you to select the type of Function App that you would like to create. In order to be able to create a Powershell based Function App you need to click the “Experimental Language Support” switch in the top right corner of the screen:


Step 10
Once “Experimental Language Support” has been selected you can choose to create a “Timer trigger” app using Powershell as the language:


Step 11
The timer trigger type of application uses a CRON type format for representing when the application will execute. You will be presented with a dialog that allows you to enter the “Name” and “Schedule” for your application to run. The schedule expression is a CRON expression that includes 6 fields. These are:

{second} {minute} {hour} {day} {month} {day of the week}

Note: This is slightly different to CRON that is used on Linux that doesn’t have the seconds value. You need to be careful when borrowing CRON syntax off the Internet. For more information on the CRON format refer to this page: https://docs.microsoft.com/en-us/azure/azure-functions/functions-bindings-timer


Note: The important thing to know about this CRON Schedule is that the “*/5” means to run once every 5 minutes.

Step 12
Now that you have created your Trigger Timer, it will appear under the Functions tree in the left side of the Function App. When you select the trigger timer it will open up a code window that is pre-filled with a single “Write-Output” statement. This is the window in which you will be pasting in the Powershell code. You will also see on the right hand side the actual Powershell file called “run.ps1” and a function.json manifest file. At the bottom of the screen there is a Logs window where all the “Write-Output” logging will be sent to. Note that Function Apps use Write-Output instead of Write-Host like you see in most Powershell script running on servers.


Step 13 - Sign up for Mailjet
The script uses a web service called Mailjet in order to send emails. In order for the Function Application to send the email it needs to send a REST call out to Mailjet with the correct Account Keys in it. The free level of Mailjet lets you send up to 6000 emails per month, which is plenty for this kind of scenario.

After signing up for the Mailjet web site go to the following location to get your API username and password:

My Account > REST API > Master API Key & Sub API key management

In your Mailjet account you will also need to set up the mail account that you wish to be allowed to send emails: 

Accounts > Sender Addresses


Step 14
Insert the following Powershell script into your Function App code window (run.ps1) and make the edits required in Step 15:


Like this:


Step 15
Edit the script as necessary for your Mailjet account and Edge servers.

Enter your Mailjet API Key (Username) and Secret Key (Password) and paste them into the following section of the script. Also update the sender email address to your email account that is configured in the "Sender Addresses" in Mailjet and the recipent email address you want to send to:


#MAIL JET USERNAME/PASSWORD#######
$emailUsername = "kjh3k23h4kjhkj37573f8f020879dff7"     
$emailPassword = "9898f98fhdjkkdjh46cd418100075a3b"
#EMAIL ADDRESS TO SEND ERRORS FROM
$SENDEREMAIL = "YourRealEmailAddress@domain.com"
#EMAIL ADDRESS TO SEND ERRORS TO
$RECIPIENTEMAIL = "YourRealEmailAddress@domamin.com"
################################## 

Edit the Skype for Business Edge server details as required. These are entered as an array of hash tables. The sections highlighted in yellow can be changed. In this case the application is monitoring 2 Edge servers, one in Melbourne and one in Sydney.

Location
ServerName
ServerRole
DestinationPort
Protocol
Melbourne
147.70.50.10
Federation
5061
TCP
Melbourne
147.70.50.10
Access Edge
443
TCP
Melbourne
147.70.50.11
Web Conferencing
443
TCP
Melbourne
147.70.50.12
AV Edge
443
TCP
Sydney
147.70.60.20
Federation
5061
TCP
Sydney
147.70.60.20
Access Edge
443
TCP
Sydney
147.70.60.21
Web Conferencing
443
TCP
Sydney
147.70.60.22
AV Edge
443
TCP
Note: The script only supports testing TCP ports at this time.

$Records = @(@{"Location" = "Melbourne"; "ServerName" = "147.70.50.10"; "ServerRole" = "Federation"; "DestinationPort" = "5061"; "Protocol" = "TCP"})
$Records += @(@{"Location" = "Melbourne"; "ServerName" = "147.70.50.10"; "ServerRole" = "Access Edge"; "DestinationPort" = "443"; "Protocol" = "TCP"})
$Records += @(@{"Location" = "Melbourne"; "ServerName" = "147.70.50.11"; "ServerRole" = "Web Conferencing"; "DestinationPort" = "443"; "Protocol" = "TCP"})
$Records += @(@{"Location" = "Melbourne"; "ServerName" = "147.70.50.12"; "ServerRole" = "AV Edge"; "DestinationPort" = "443"; "Protocol" = "TCP"})

$Records += @(@{"Location" = "Sydney"; "ServerName" = "147.70.60.20"; "ServerRole" = "Federation"; "DestinationPort" = "5061"; "Protocol" = "TCP"})
$Records += @(@{"Location" = "Sydney"; "ServerName" = "147.70.60.20"; "ServerRole" = "Access Edge"; "DestinationPort" = "443"; "Protocol" = "TCP"})
$Records += @(@{"Location" = "Sydney"; "ServerName" = "147.70.60.21"; "ServerRole" = "Web Conferencing"; "DestinationPort" = "443"; "Protocol" = "TCP"})
$Records += @(@{"Location" = "Sydney"; "ServerName" = "147.70.60.22"; "ServerRole" = "AV Edge"; "DestinationPort" = "443"; "Protocol" = "TCP"})


Step 16
By default your Function App will be running at the CRON trigger interval. However, you can stop your Function App from running by switching off the trigger function in under the “Functions” tree item on the left hand side:


Step 17
Start receiving emails when your Edge servers are offline!


The Wrap Up


Well, this has been fun! Hasn’t it?! I hope that in addition to helping you monitor your edge servers, this has been informative and taught you some new skills that might help in the future when making your own Function Apps. Enjoy!


Read more →

Popular Posts